This document is intended to be used as an instruction guide for both making and using
the Fluting Jig. Special thanks to the following friends and fellow knappers:
Jim Miller - who started me making the jigs and for his tips and suggestion on improvements to the jig and fluting techniques.
Emory Coons - whose jig I used as a basis for the one I make and for demonstrating his fluting techniques at various knap-ins
The Fluting Jig consists of the following:
1. A steel base made from flat stock 6" x 12" x 1/8" or 3/16".
2. Two uprights, 1-1/4" wide, 12" lengths of steel angle stock that have 1/4" holes
drilled on one side as close to the angel as possible. The holes are positioned 3/4"
apart (center to center) and extend to the top of the uprights. The uprights are
welded to the base on three sides (the face or front of the uprights are not welded
so as not to interfere with the placement of the point).
3. The uprights are parallel and 1" apart to allow for large flutes and the tops of the
uprights are connected by a welded small steel cross member to prevent them
from spreading.
4. The fulcrum is a 1/4" diameter pin secured by a clip pin for easy removal and
adjustment.
5. The lever rod is 1/2" diameter, copper plated grounding rod. The tip is ground to a
point and then flattened on one side to provide the best platform for engaging the
fluting nipple on the point. The back side of the rod where it engages the fulcrum
pin is also ground flat to prevent the lever from twisting or turning under the
fluting pressure.
6. Shims, used to position the point relative to the lever rod/fulcrum are 3/16" steel,
1/8" aluminum and 1mm copper. The steel shim is just for height adjustment but
the copper and aluminum may be used for both height adjustment and tip support.

Instructions for Use
Set-up
To use the fluting jig, place an appropriately formed point* against the face of the
uprights with the point resting on the base. Position the fulcrum pin above the
base/nipple of the point far enough above so that there is room to place the lever rod
between the fulcrum pin and the nipple on the base of the point. The pin should be
inserted into the holes approximately 3/4" above the nipple. Use the included shims to
raise the point so that when the rod just touches both the nipple and the fulcrum pin the
angle of the rod is approximately 10° above horizontal.
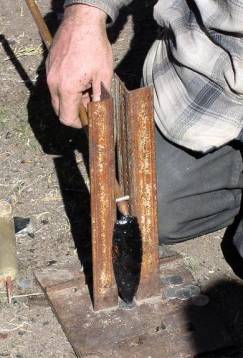
Here is an example of the proper positioning of the point in the jig. Note that coins,
especially those with copper such as pennies or quarters will work for shims. Wood
wedges are also effect when used to adjust the height of the point relative to the
fulcrum/lever and provide good support for the tip.
Applying the Pressure
With the tip properly positioned, begin by slowly applying downward pressure on the
nipple by lifting up on the opposite end of the lever. A slight pulling motion on the lever
during the final stages of the upward pressure on the nipple will help remove the flute.
This pulling action is similar to the flake pulling technique used in pressure flaking.
While I could speculate on why different techniques work and then try to explain every
nuance of proper jig technique, suffice to say I’d never be able to describe it well enough
to compensate for practice and/or trial and error. The knappers I know that are best at
fluting have spent hours developing their techniques and have made and broken literally
hundreds, if not thousands, of points. Even the best knappers I know are only successful
three out of five attempts – success being a good looking point fluted more or less evenly
on both sides.
Then again, I’ve personally witnessed an expert knapper make three and sometimes four
excellent Clovis points in a single hour, while only breaking one or two of five attempts.
Using a jig, and there is evidence that various Native American tribes did, makes fluting
easier and more consistent for most knappers than other method like direct percussion.
*Properly formed points
A properly formed point has two distinct features. First, a prominent ridge in the center
of the point running from tip to base. Down this ridge is where the fluting energy is
directed, with either a percussion or jig/lever technique. Second, a ‘nipple’ on the base of
the point. This ‘nipple’ is basically a strong, clearly isolated platform on which the jig
lever is place to drive the flute off the point.