 |
 |
 |
 |
 |
 |
|
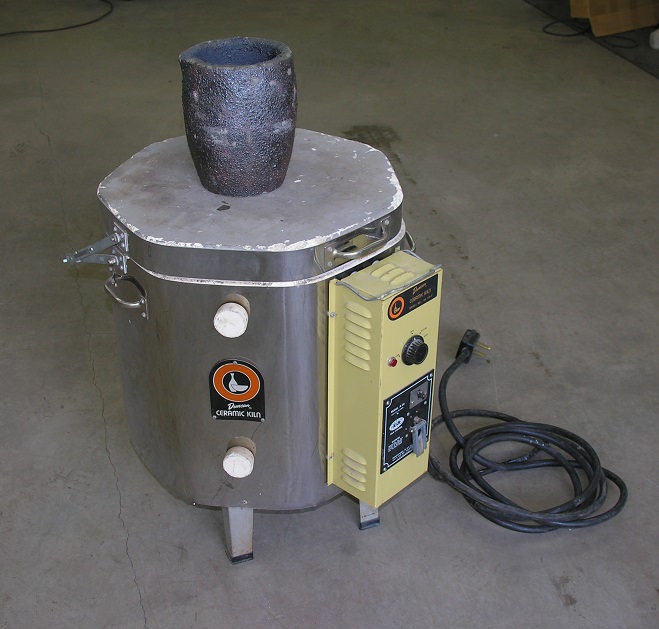
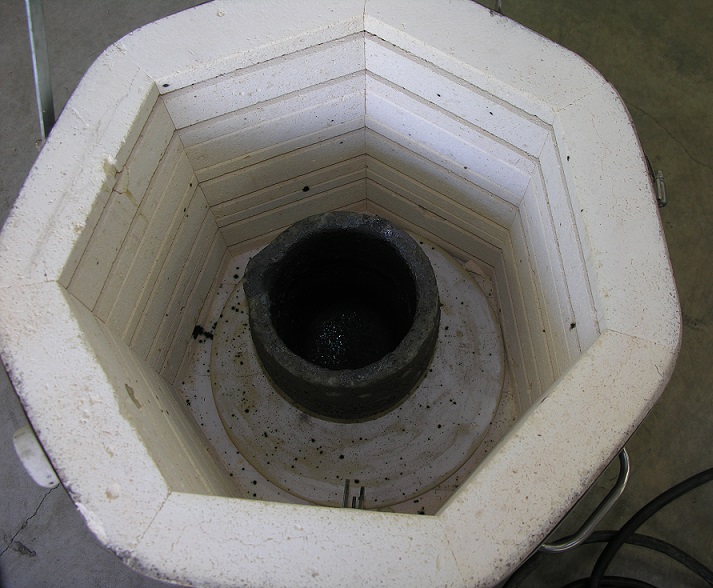
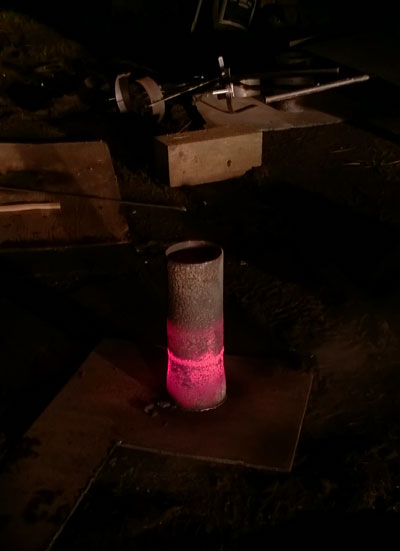
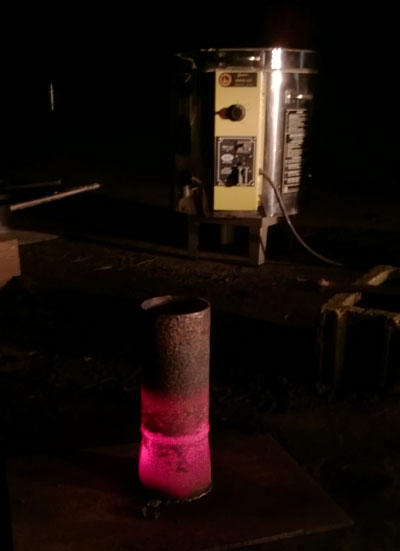
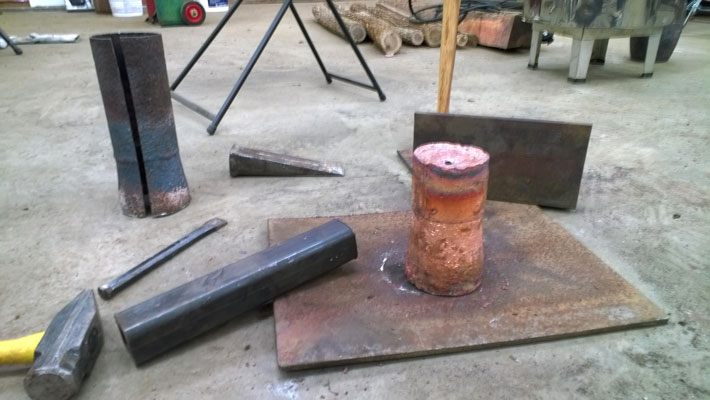
Casting a Large Copper Spalling Billet* by James Keffer with help from Barry Bonnell, Blain Kuykendall and Mick Hill Part 1 - First Casting For those of us in the PNW having access to large (150 pound plus) obsidian pebbles it is a challenge to break up these chunks in such as way as to yield the largest and greatest number of knapple pieces. There are a number of way to create large knappable pieces of obsidian - diamond slab saw, feathers and wedges and spalling are the most common. Of these, spalling is the quickest and most efficient provided that, 1) you have a suitable spalling billet and 2) you learn how to use it. For most of us purchasing a copper spalling billet of suitable size, say 30 - 35 pounds is not a viable option. The cost of purchasing a 10" - 12" long by 4" diameter (approximately 40 pounds) is around $600, depending on shipping1. An alternative to buying a copper spalling billet is to make your own. Part 1 is a method for obtain a spalling billet - copper casting using a pottery kiln. Part 2 uses a propane forge. This How-To article is intended as guide, based on our collective experience, on two viable ways to melt copper and cast billets. The authors assume no responsibility for others using any or all of this guide or for accidents as a result of attempts to cast copper. We would however, like to emphasize that rehearsals of the entire process are, in our opinions, essential for safety and success! Materials: 1. Scrap copper (clean, no insulation, etc., wire, plumbing pipe, motor windings, plate, bar, tube, etc.) Scrap copper retails for about $3.50 - $4.00 a pound or about $120 for 30 pounds. Tools 1. Medium to large pottery kiln Safety Equipment 1. Safety glasses and full face shield2. Leather welding jacket, leather apron, leather boots, leather gloves (welding) - heck I'd have worn leather undies if I'd had some! 3. At least two people, preferably three. Four if you want photos! 4. Anything else you have that will protect you from molten copper! Procedures ***Note*** The Most Important Procedure is to PRACTICE DRY RUNS before melting any metal. It also helped to watch the various casting videos and learn from their mistakes! ***Note 2*** DO ALL MELTING AND CASTING OUTSIDE unless you have adequate space inside! ***NOTE*** Fire extinguishers, buckets of sand and appropriate clothing are a must! Copper melts at 1984o F so it takes a kiln that can exceed that temperature. The kiln I used peaks out at cone 10 or about 2318o F. It is also large enough to accommodate a 14" graphite crucible (courtesy of Joe Higgins) and the lifting tongs. First we placed the crucible into the kiln on a kiln shelf and loaded it with scrap copper. It helps to compact the scrap copper first and we did that by placing the scrap into a 4" steel pipe and smashing it down with a slide hammer. Then we turned up the kiln to the maximum firing temperature and waited. It took about 10 - 12 hours to melt 24 pounds of copper, including the time it took to add additional copper. Once the copper was completely melted we heated the steel mold to a dull red with the acetylene torch. It is never a good idea to pour molten copper into a cold mold - very dangerous reactions could occur! We then opened the kiln and, using our lifting tongs, carefully lifted the crucible out of the kiln and placed it into the carrier/pouring cradle. We then lifted the carrier and slowly and carefully poured the molten copper into the mold. After about an hour we were able to cut away the mold using a 4.5" angle grinder and metal cutoff wheel. The copper remained too hot to handle without gloves for several hours. Lessons Learned In order to make the process safer and more efficient, we compiled notes at the end of the casting. Here is some of the lessons learned. 1. Know your equipment, especially the kiln. Our kiln shut off after just four hours and we had to re-start the process, almost losing the crucible. We learn how to over-ride the automatic shut-off. 2. Rehearse, rehearse and rehearse. We did a number of dry runs of the entire process and even used 25 pounds of lead shot in the crucible to simulate a crucible full of copper. Supporting a 25 pound crucible with home made lifting tongs and then transferring the crucible to our home made pouring cradle gave us confidence in the tools and the process. 3. At almost 2,000 degrees Farenheit, molten copper is hot - VERY HOT (DUH!). Proper clothing and protective gear is essential and you can't have too much. The Kiln and Crucible
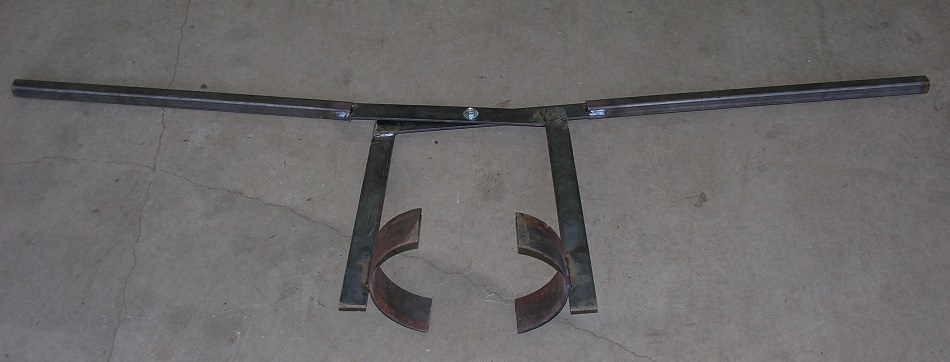
The Fabricated Tools Crucible Tongs
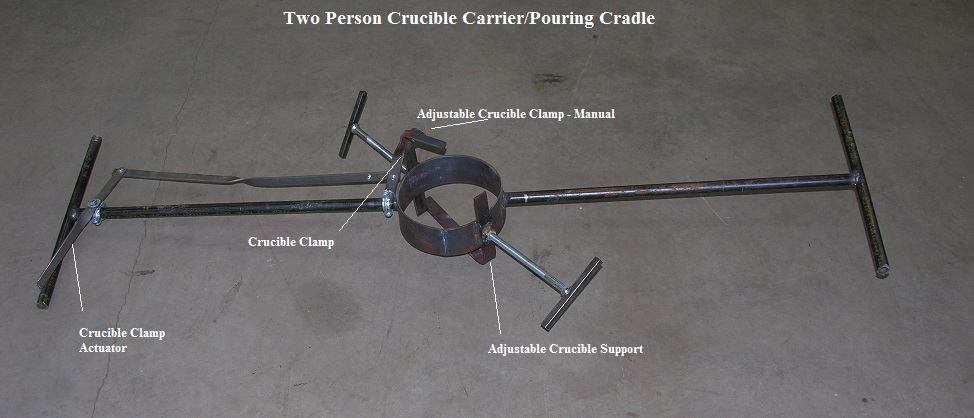
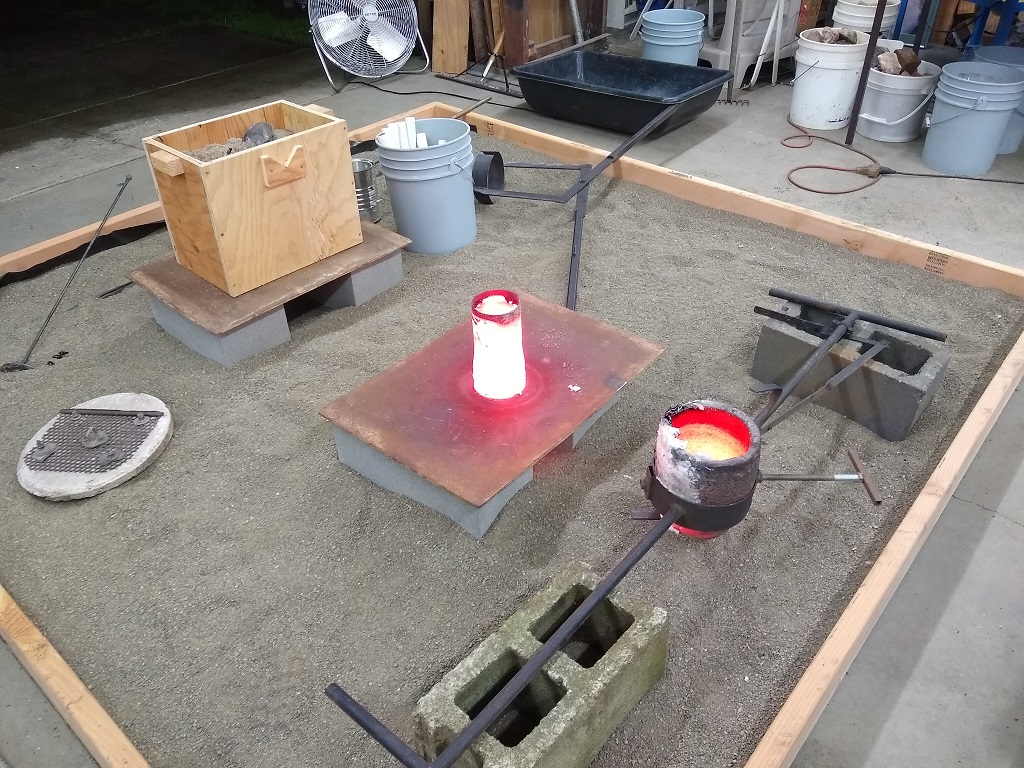
Crucible Carrier/Pouring Cradle
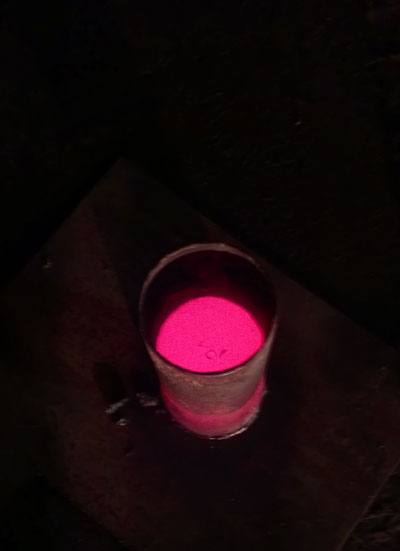
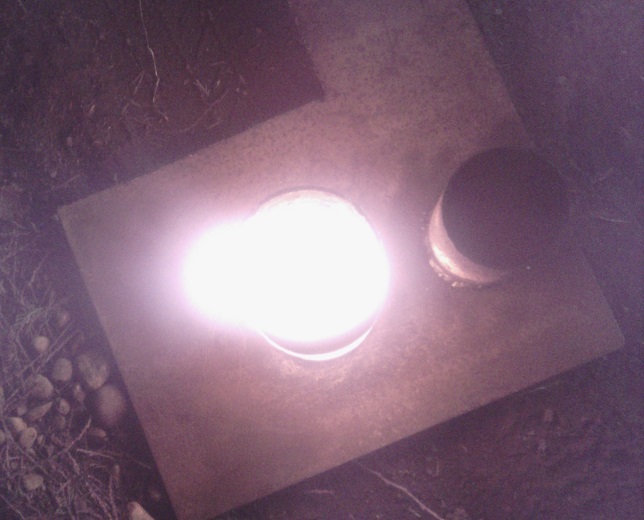
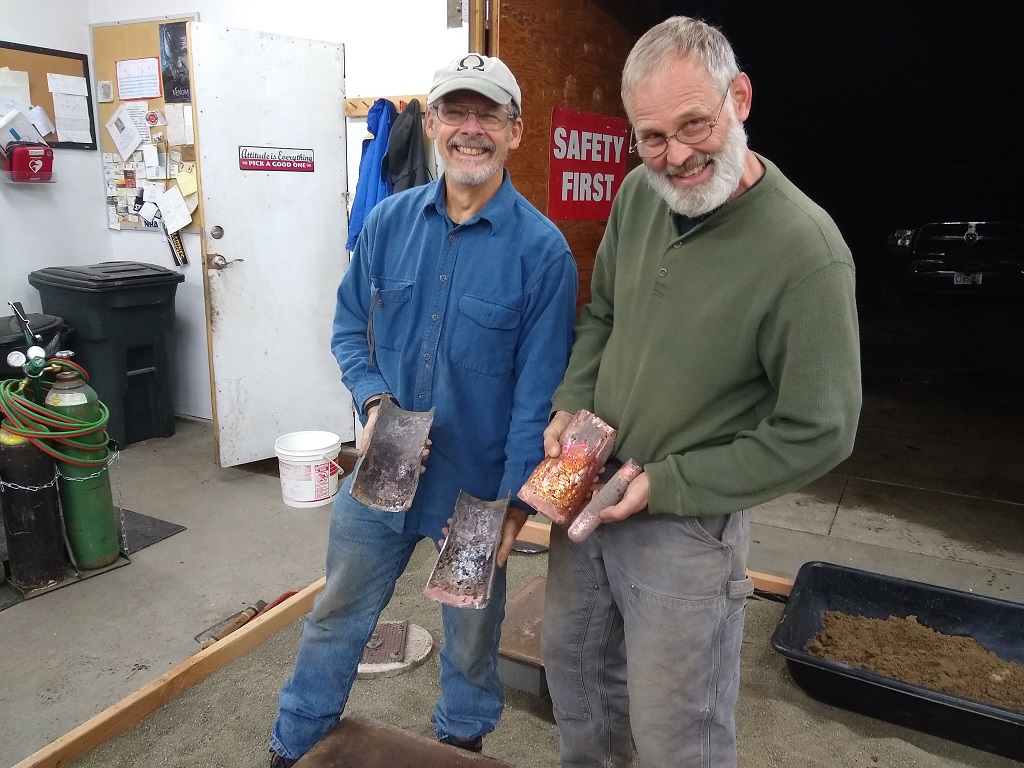
Immediately after the pour - Barry grabbed his cellular phone a got a few photos! Initially we planned this as a trial run and didn't expect the first pour to go as well as it did! (next time more photos and maybe a video!)
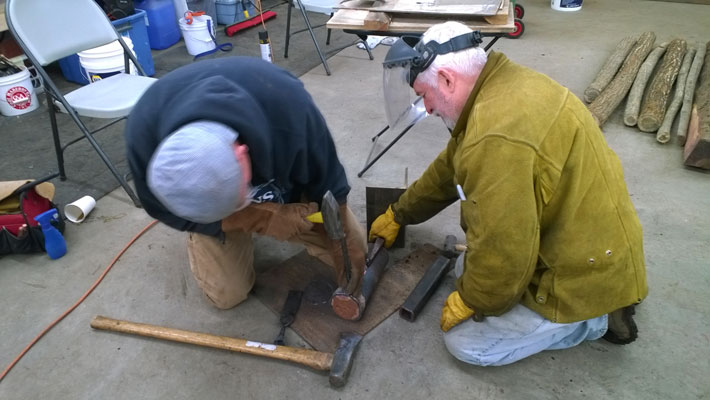
Blaine and Jim Cutting away the mold
First ever Copper Spalling Billet - 23.4 pounds!
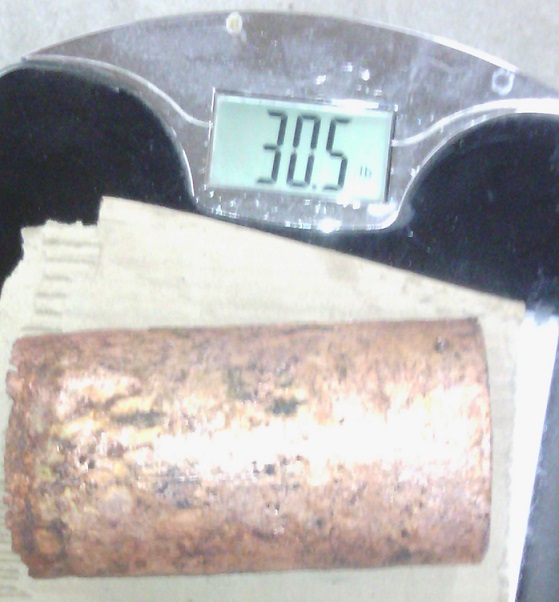
This is the second casting. This time it took place at 11:00 pm primarily because we figured out how to prevent the kiln from inadvertantly shutting off. We (Blaine Kuyhendall and Jim Keffer) put the initial load of copper into the crucible and kiln and 11:00 am. Jim added more copper at 5:00 pm, 7:00 pm and 10:00 pm. As expected the molten copper help speed up the melting of each additional batch of copper. In retrospect we probably could have saved a couple hours by monitoring it more frequently. We were aiming for a total billet weight of 30 lbs (next time we will weigh all the copper before hand.
We still did not have a photographer for the pour - which is real cool to watch at night, but we did take some photos with a cellular phone of the mold and crucible right after. The temperature of the copper/crucible is between the melting point of copper 1,984°F (1,085°C) and the max temperature of the kil (2375°F 1301.7).
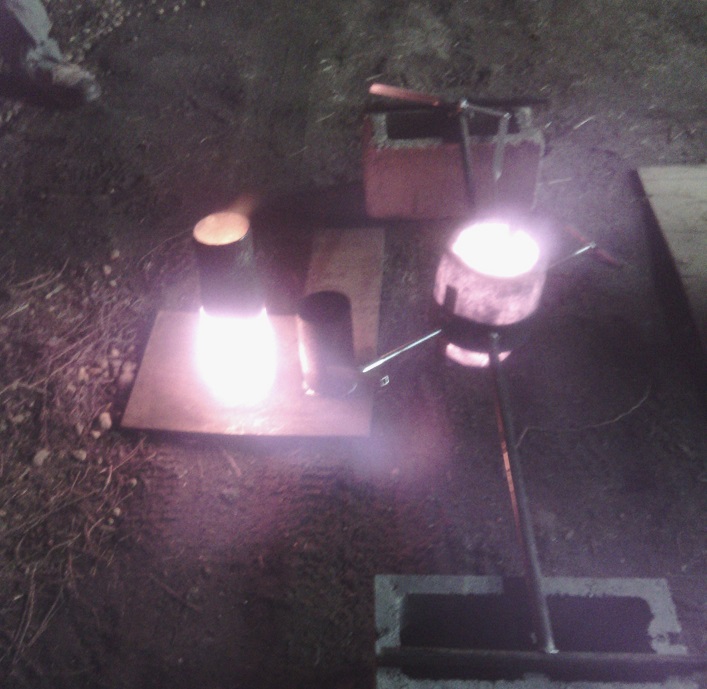
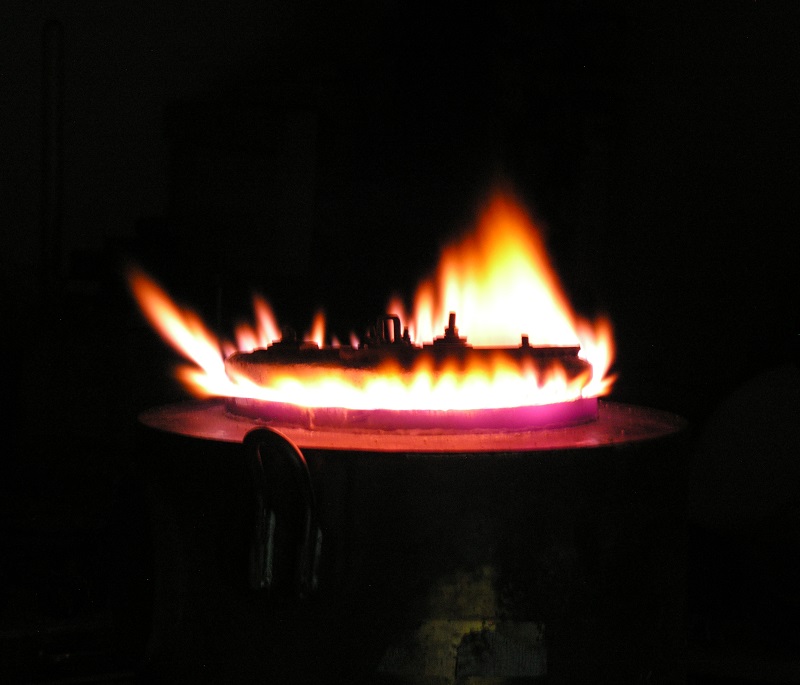
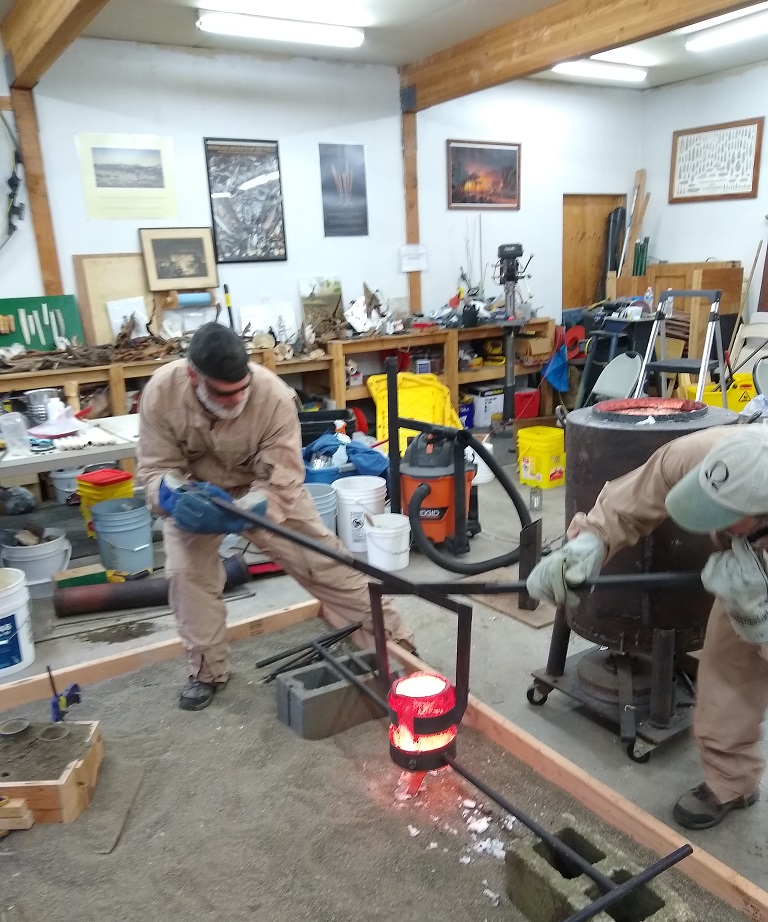
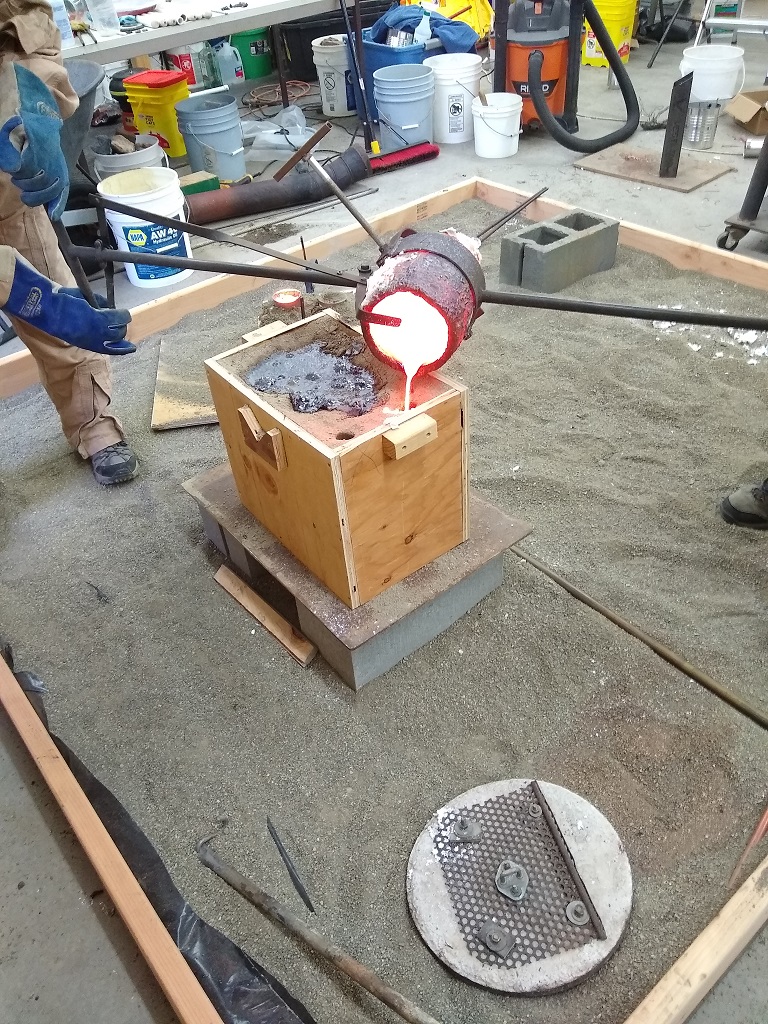
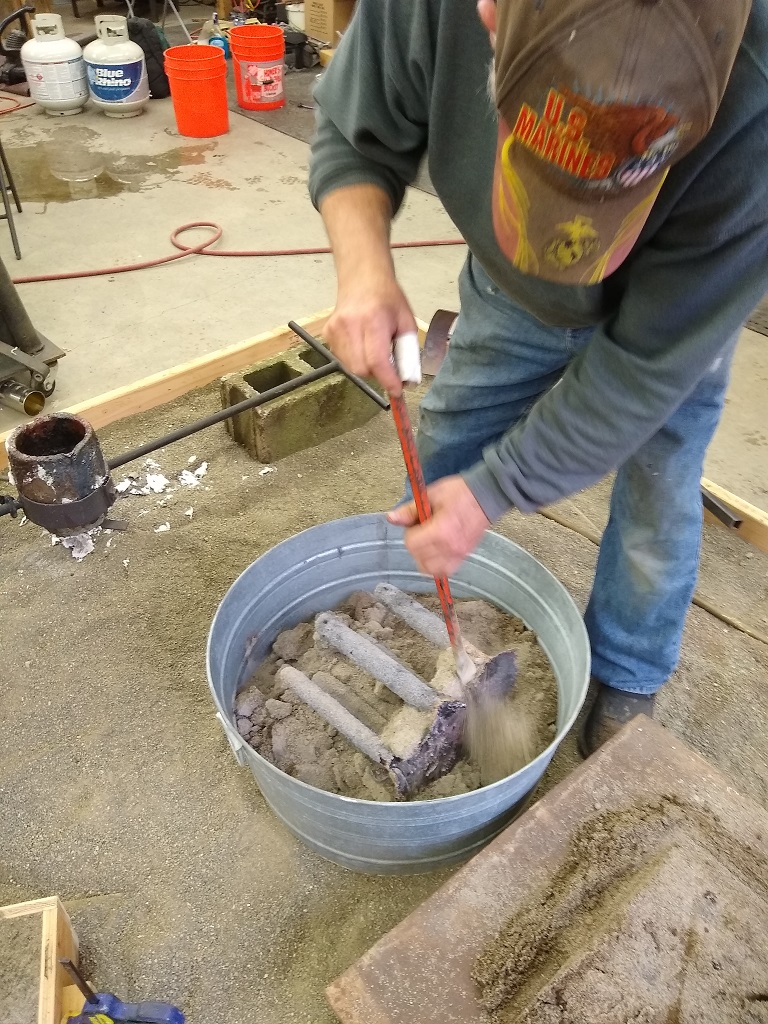
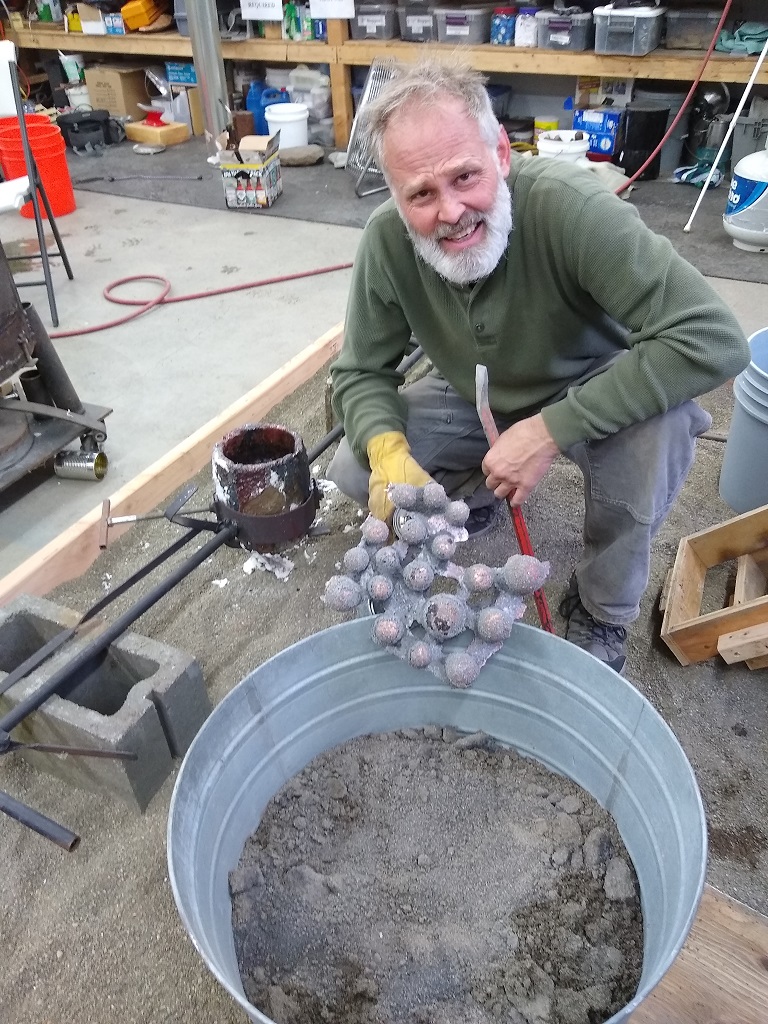
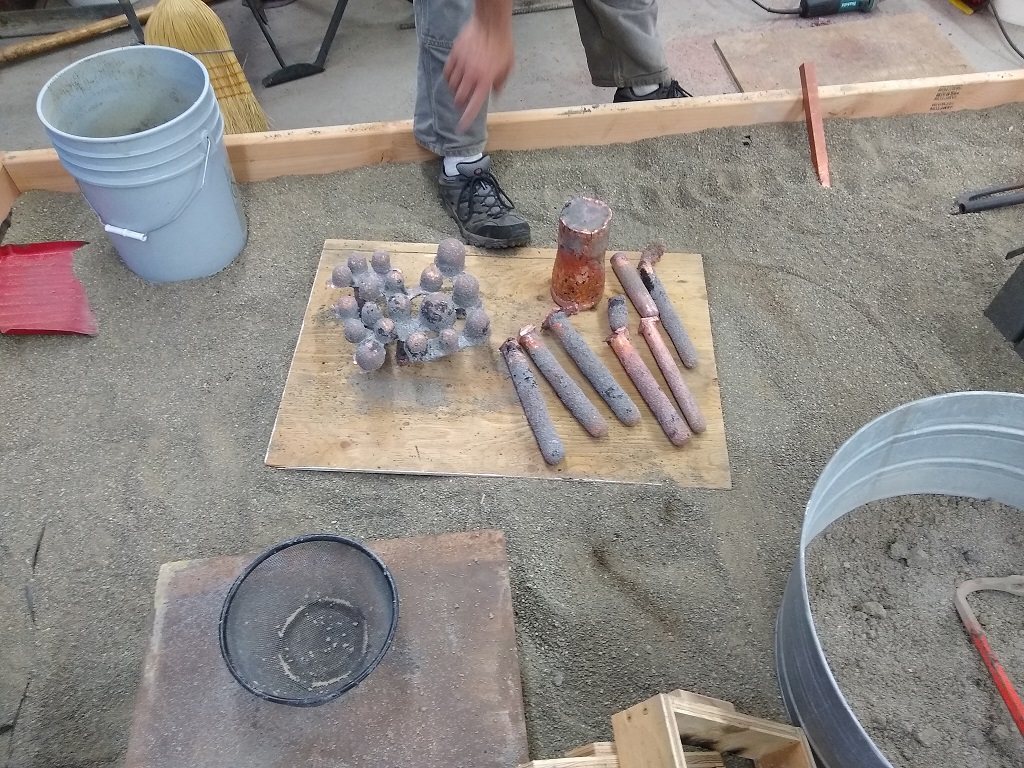
Part 2 - Second Casting Jim Keffer and Mick Hill. with help from Barry Bonnell In this casting we used a home made, single burner, propane forge to melt 30 lbs of clean scrap copper in an attempt to cast a 30 lbs spalling billet. With the exception of the forge, all the tools and procedures were identical with the first casting in Part 1. Mick and I rehearsed the entire process a half dozen times and discussed multiple scenarios of possible problems. We even used 25 lb bags of lead shop to simulate the weight of the copper in the crucilbe. We felt we were reasonably prepared. The home made forge use a single, naturally aspirated (Venturi) burner made by Jim Keffer from a design used by bladesmiths at the Funk Hammer-in in Seattle, This single burner was more than adequate to melt copper, especially when forced air from a compressor was introduced. But because the single burner did not immediately distribute heat evenly and we did not want to subject the crucible to thermal shock, we pre-heated the curcible in the pottery kiln. We ran into some technical difficulties when the graphite crucible we were using became fused to the fire brick and ceramic supports on which the crucible sat within the forge. We suspect that the single propane burner produced enough heat to melt the fire brick and ceramic posts. As a result we had a difficult time removing the crucible from the forge and when we did get the crucible out, two fire bricks and a ceramic post were fused to the bottom of the crucible. Fortunately we were able to dislodge the brick without breaking the crucible and proceed with the pour. Unfortunately the copper had started to solidify by then and we were only able to pour two thirds of the copper into the mold. We were able to re-melt the remaining 10 lbs of copper in the kiln and pour it into a second standby mold - thus saving the crucible and the copper! Lessons Learned Once again we tried to learn from our mistakes as well as our successes. 1. Expect the unexpected and have a back-up plan. When the firebrick fused to the crucible and we had to try and dislodge it so we could transfer the crucible to the pouring cradle. Luckily, we were able to knock the bricks loose with just a could of taps with blacksmith's tongs. In retrospect, attempting to do this without a catch basin in case the crucible broke was a mistake - one that could have had serious consequences. We now have a large steel washtub filled with sand in which to place the crucible. 2. Having a back-up kiln turned out to be very important - re-melting the copper in the crucible probably saved the crucible, Since the fire brick and ceramic support furniture in the forge had fused and, to some extent, collapsed, re-heating the crucible and copper in the forge was not an option. 3. We will probably try kiln wash on the fire brick and ceramic supports in the future to, hopefully, prevent both from melting. 4. Pre-heating the molds in essential - if you don't the molten copper will likely pop and spatter. Even a tiny bit of molten copper can ignite fires or burn individuals. We neglected to pre-heat the standby mold but luckily the spatter was minimal and did no harm. 5.Proper ventilation is important. Both of the large shop doors were left open and the whole room fan/filter was running the entire time. 6. Safety equipment - two large fire extinguishers nearby, two more on shop walls, a five gallon bucket of sand and 10 gallons of water were available as well. The sand was to suppress molten copper, the water to treat burns. 7. Consoldiating the scrap copper and compressing it at tight as possible makes it easier to get more copper into the crucible and reduces the amount of time it takes to melt the copper. Here's Mick compressing the scrap copper into tight wads, Note the flame coming from the top of the forge
Forge with the lights out
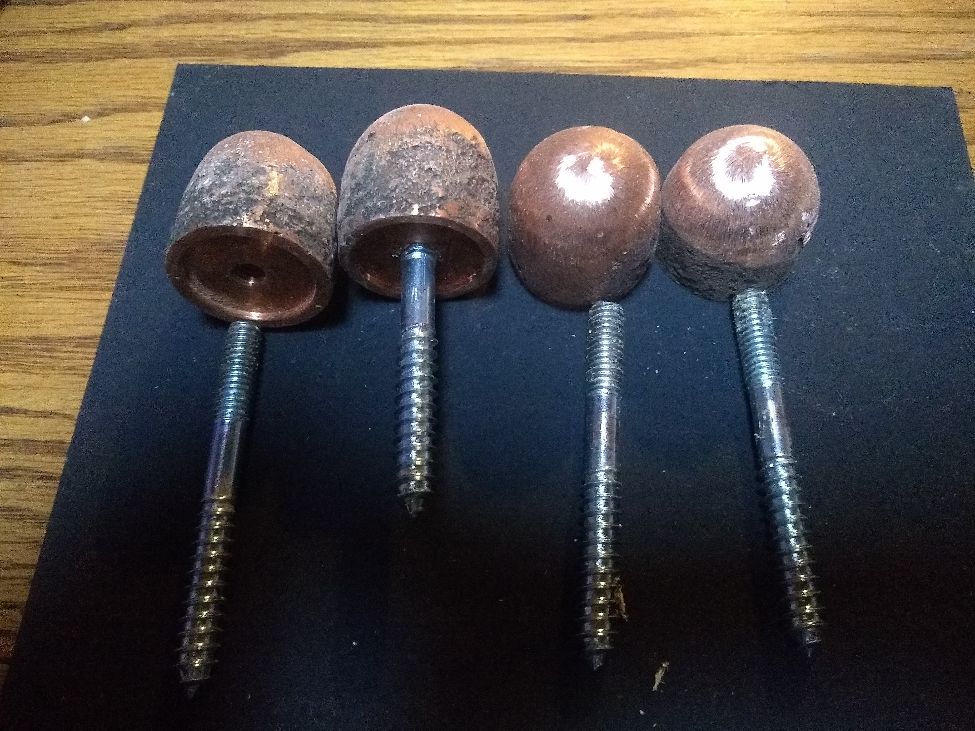
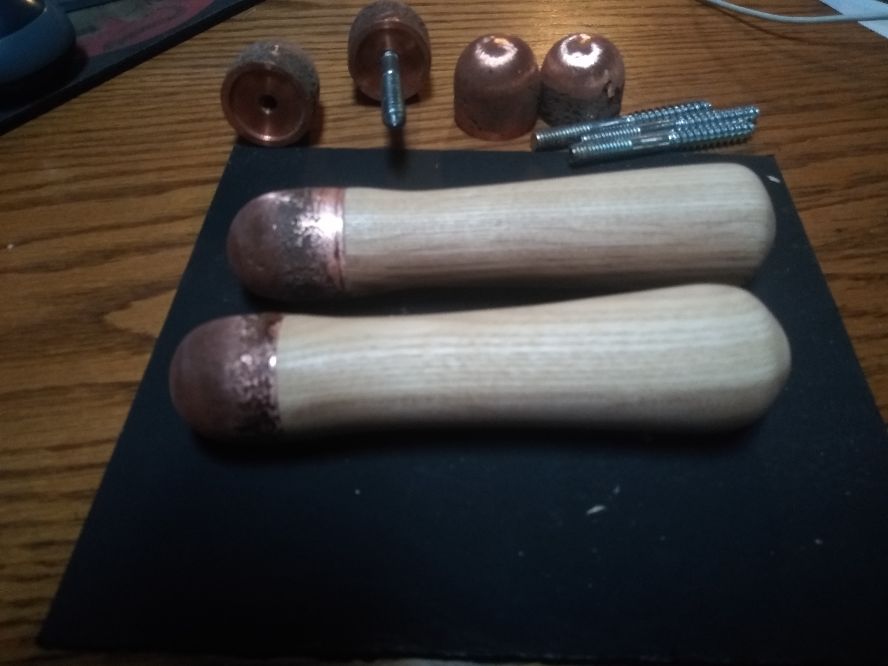
Here's a link to a video we took of the process. Note each of us are wearing Nomex fire-proof flight suits, leather aprons, leather welding gloves, safety glasses, face shields, cotton hats and leather boots. All undergarments were cotton - synthetic clothes, nylon, rayon, polyester, etc., are very dangerous around heat and/or flame! Casting Copper - Part 3, Billets and Boppers *Author assumes no responsibility for any accidents resulting from the casting of copper. This article is intended for informational purposes only. Try this at your own risk. |
|
©2010 J Keffer |