Flint Knapping: Tools
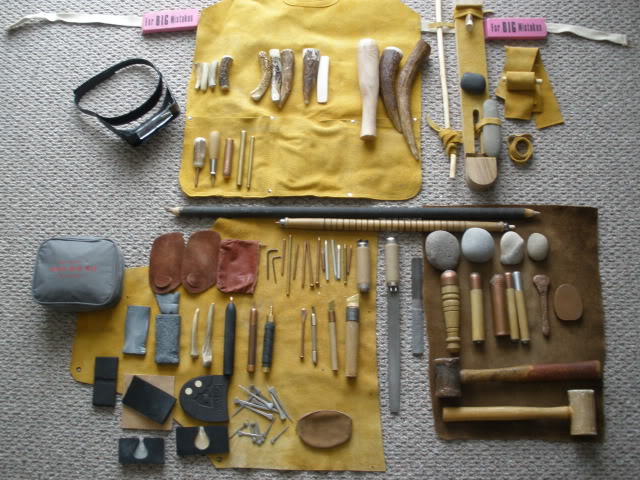
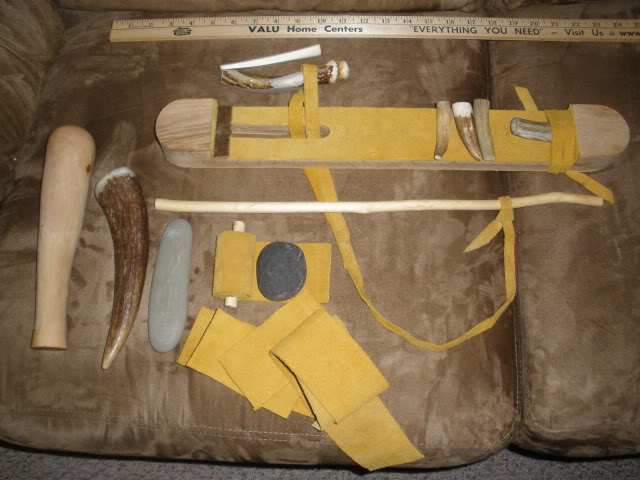
Gary Abbatee’s tool kit, used with permission
Compiled/Edited by Michael Lynn
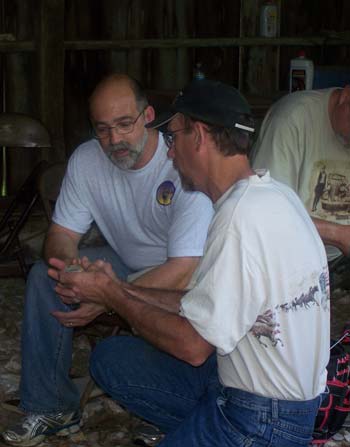
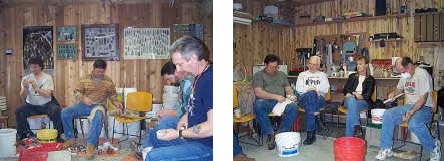
Photo of Tim Dillard teaching me at the Center for American Archaeology in Kampsville, IL
Dedicated to all those who have taught someone else about the art of flint knapping, especially to my primary teachers – Bruce Boda, Tim Dillard, Mike McGrath and Steve Nissly. This is my attempt to pay forward.
© Michael Lynn, 2010
Although the copyrights to the individual articles and tutorials in this e-book belong to the authors, I have copyrighted this collection. It may be freely printed, copied, posted on the internet and otherwise distributed as long as said distribution is free and appropriate credit is given to me and the authors. This e-book may not be sold for profit.
| Flint Knapping: Tools | |
|---|---|
| What Do You Really Need to Start Flintknappig? by Wyatt R. Knapp at www.onagocag.com | 3 |
| Pictures of Modern Tools from Primitive Materials by Charlie (aka Stonefacescar) at www.paleoplanet.net | 5 |
| Making a Horseshoe Nail Notcher by Mark Dellinges at www.paleoplanet.net | 12 |
| Simple Fluting Jig Pictures by Ken Wallace (aka Paleoman52) at www.paleoplanet.net | 15 |
| Tony Sear’s Fluting Jig by Richard Meyers (aka Twobear) at www.paleoplanet.net | 18 |
| Rocker Punch Board by Gary Abbatte (aka rhyeswithwhat) at www.paleoplanet.net | 19 |
| Converting a Pottery Kiln to Heat Treat Flint by Mark Bracken at www.flintknappingtools.com | 22 |
| Dan’s Caveby Dan Long at http://knapper_dan.tripod.com | 26 |
| Paleoman52’s Cave Pictures by Ken Wallace (aka Paleoman52) at www.paleoplanet.net | 30 |
What Do You Really Need To Start Flintknapping?
Wyatt R. Knapp © copyright 2003.
A FLINTKNAPPER'S TOOL KIT
I've been involved with flintknapping for some time now. I've been through a lot of searching and tool testing. If I've learned one thing it's that there is no magic tool. Don't fool yourself by thinking, "Oh, if I only had the tool that so and so uses I'd be able to flintknap." Or, "there must be some tool that makes this simple." Let me tell you, if there was a trick to it that made it easy then everyone would be doing it and it wouldn't be a big deal. Now, come over here and let me whisper the secret of flintknapping success into your ear. Ready? Okay ... you have to do it a lot. You have to practice and go through lots of material. And keep trying. You will learn and get better. I promise.
Now, after all these years I feel confident that I can give some good advice on what tools you absolutely need to be a good traditional style knapper. Don't collect a big old bucket of expensive tools and gadgets unless you like that sort of thing. Here's all you really need:
- A leather pad of thick leather to protect your hand when pressure flaking.
- A deer antler tine pressure flaker (or a copper tipped one as shown below). Antler tines work very nicely. They wear faster than copper but you get great pressure flakes. If you learn percussion work well, you will only need the pressure flakers for final edge sharpening and retouch anyway.
- A medium sized antler baton, about 8 inches or so long and about 2 inches across at the business end. Make sure it is a good dense one. Antler is NOT harder to use than copper boppers. Knapping is not easier with copper. It is just as easy to learn to knap with traditional tools than it is with copper billets and such. Try the abo way.
- A few hammerstones of various sizes. Quartzite or some other hard stone of a nice egg shape. One about 1 1/2 inches long, one about 2 1/2 inches. Also you can add a couple of sandstone ones that will be able to be used on easier material like obsidian or glass. You can usually find hammerstones by gravel pits, the lake shore, etc.
- An abrader. Either of hard sandstone or a manufactured one.
- A large thick leather pad to protect your leg while knapping.
- A notcher. Make it from a cow rib bone, or an antler tine, or make a copper tipped one.
Now you will notice that of all those things, there is only one that would probably constitute a major purchase. That would be the moose antler baton. Prices for good antler batons can vary and there are deals out there. Just make sure the one you choose is good and hard, and dense.
The rest of the stuff on our list can be obtained cheaply, made yourself, or found for free.
These are the only tools you really need in order to flintknap and I have found that these are the ones I rely on over and over again. They could fit in shaving bag or could be rolled up into a small leather parfleche and take up hardly any room at all.
Later on you may find that once in a long while you'll have need of a larger billet for spalling or something, but hey -- try a rock. They're free and lots of abo knappers used them. I think there was probably a lot more hammerstone knappers than we realize in prehistoric times. With practice you'll be surprised how well you can remove flakes with stone tools.
Bottom line: You don't have to break your bank account trying to buy every new tool under the sun in order to turn out beautiful points. Do it the abo way!
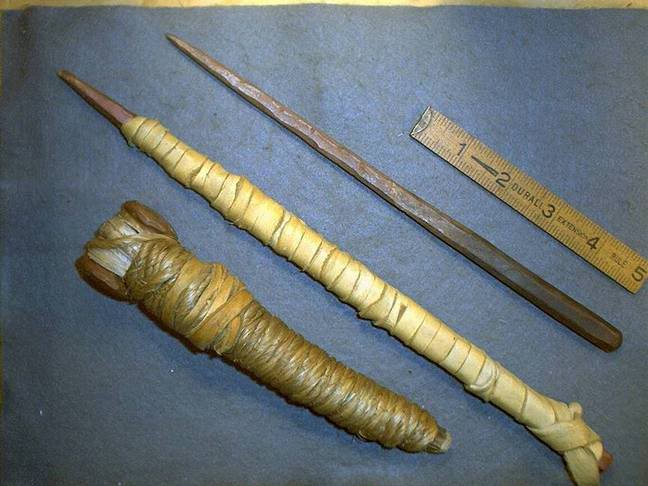
A Broomhandle Pressure flaker
Take an old broom or shovel handle and cut off a piece that is a comfortable length for your tool handle. Drill into one end of it to a depth of about 2 inches. The diameter of the hole should match the size of your copper wire (Something about 3/16" diameter is nice, but make all different sizes). Cut the wire so that it when it is put in the hole it extends out about 1 1/2". Hammer the wire to a point at the end. I would also suggest that you hammer some flats into it as shown in the illustration. You may want to add a set screw to hold the copper tip in place.

If you want you can make the handle a couple feet long and turn this into an Ishi stick. Many people feel they can get better leaverage using the longer handle and bracing it under their arm or against their side.
From http://www.onagocag.com/tools.html, April 1 2010, Copied with permission
Note: Wyatt R. Knapp is the author of "The New Atlatl and Dart Workbook" to be released Summer 2010.
Pictures of Modern Tools from Primitive Materials
By Charlie (aka Stonefacescar) Here are the tools that I made and use...
split branch ishi stick ishi stick adjustment
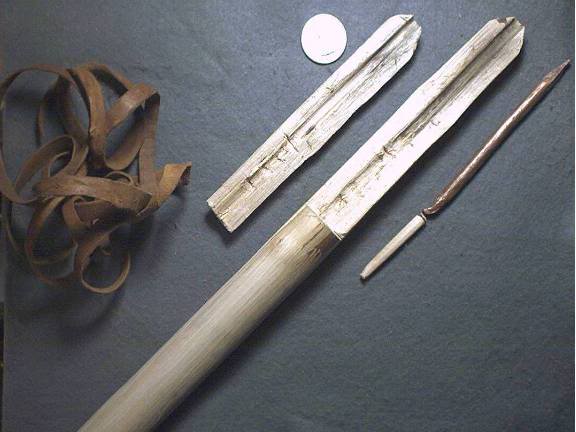
wrapped another hammer, encased in rawhide
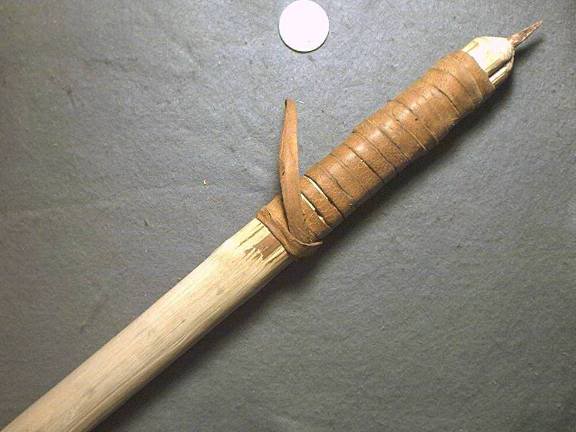

hand flaker, showing the little bent 'cleat' or 'spur' that locks the tool into the inside of the handle
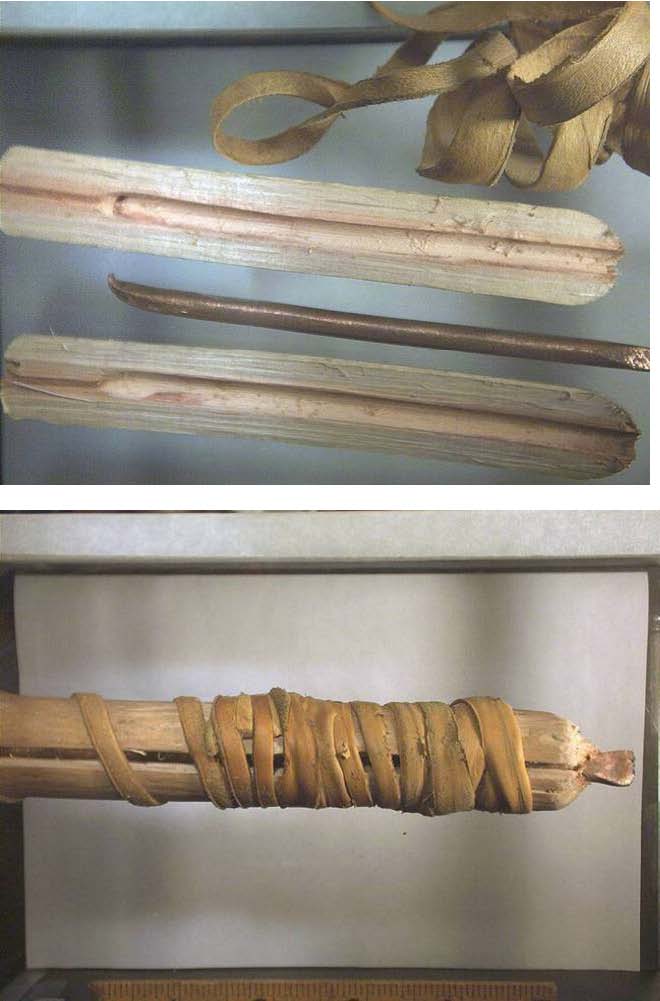
percussors
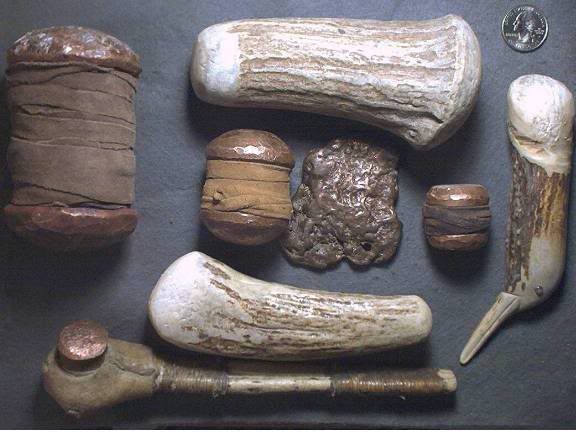
raw copper nugget percussor, and a splitting wedge/percussor antler tine holders
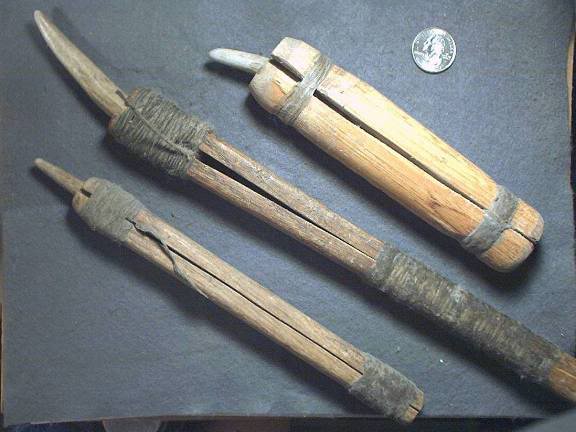
done with these tools
notching tool tip shape..
if you use branches off a tree, instead of dowels, it is easier to split the branch, down center, and it is easier to follow the 'pith' to hollow out the center with stone tools, for the antler or copper tools tips...
hope this helps
Charlie
From http://www.paleoplanet.net/, April 3, 2010
Making a Horseshoe Nail Notcher
By Mark Dellinges
I made this horse shoe nail holder from plumbing supply parts. You'll need a 1/4" hose barb adapter, 1/4' brass pipe nipple,1/4' pipe cap, horse shoe nails, wooden dowel, self cured acrylic resin or epoxy resin, and optional rubber tubing.
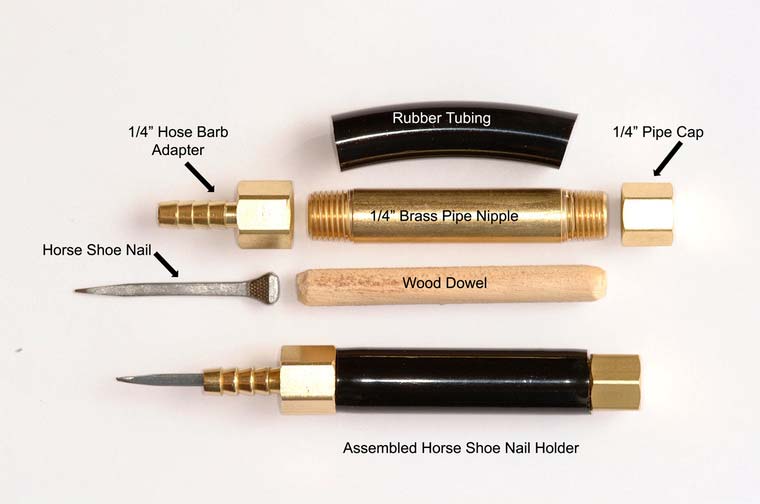
Fill the inside of a hose barb adapter about half way up with resin and insert a lubricated horse shoe nail. Allow to set and tap out the nail. Nails of similar type are now interchangeable and have good "side to side" stability.
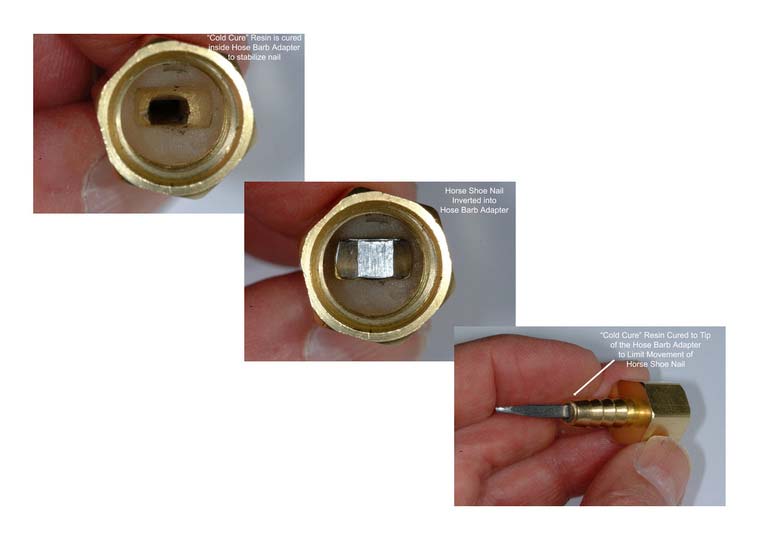
Now assemble by screwing the hose barb adapter to one end of the pipe, insert the wood dowel and tighten the pipe cap to the other end. Note the good "front to back" stability. If
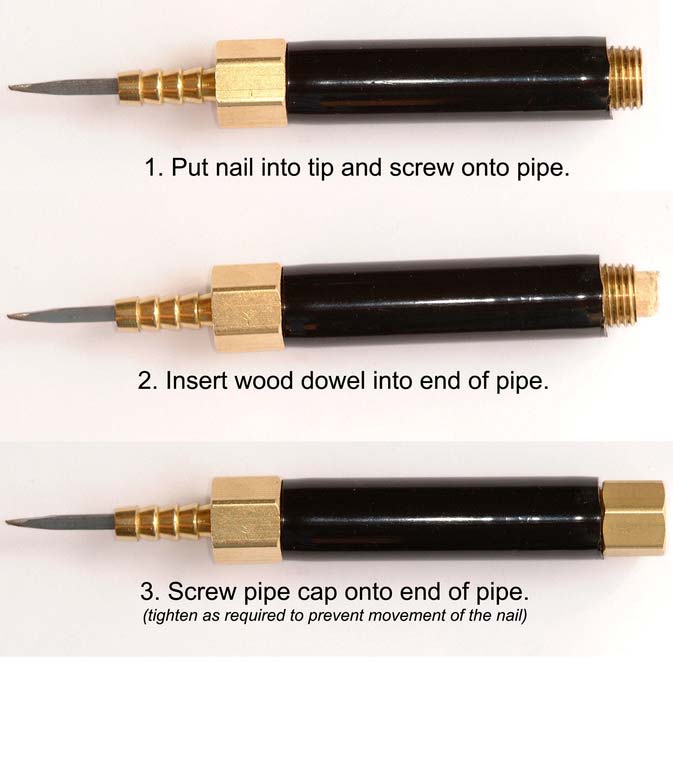
My "narrow entry" notching really improved once I found a way to keep the horse shoe nail vary stable. I hope this helps!
From http://paleoplanet69529.yuku.com/replyreply-275691, April 4, 2010, copied with permission
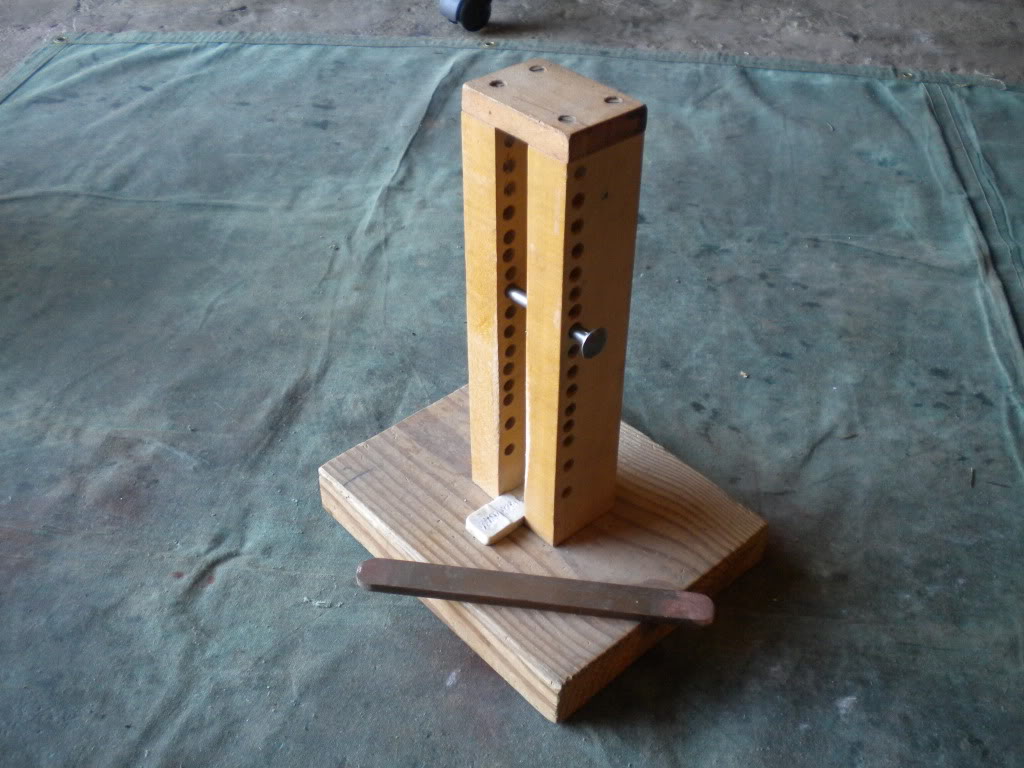
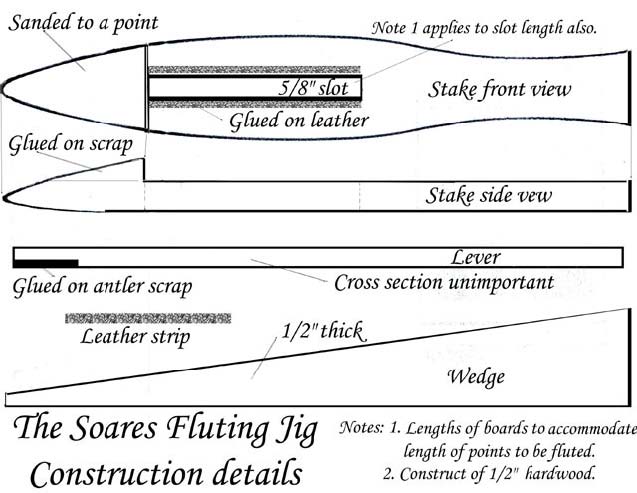
Simple Fluting Jig Pictures
By Ken Wallace (aka Paleoman 52)
To go along with the thread on fluting nipples I am posting a few pics of the fluting jig I have been using since 1993. As you can see this is a pretty uncomplicated device. The secret to making this jig work well is to be sure to spend as much time as you need to on preparing the fluting nipple. Always make sure that the ears of the point aren't pressing to hard against the uprights because this will cause them to snap off. Also be sure that when you are applying maximum pressure that the bar is almost 90 degrees with the preform. It helps to give a tug on the bar once you've applied to pressure you need to cause the fracture that releases the flake.
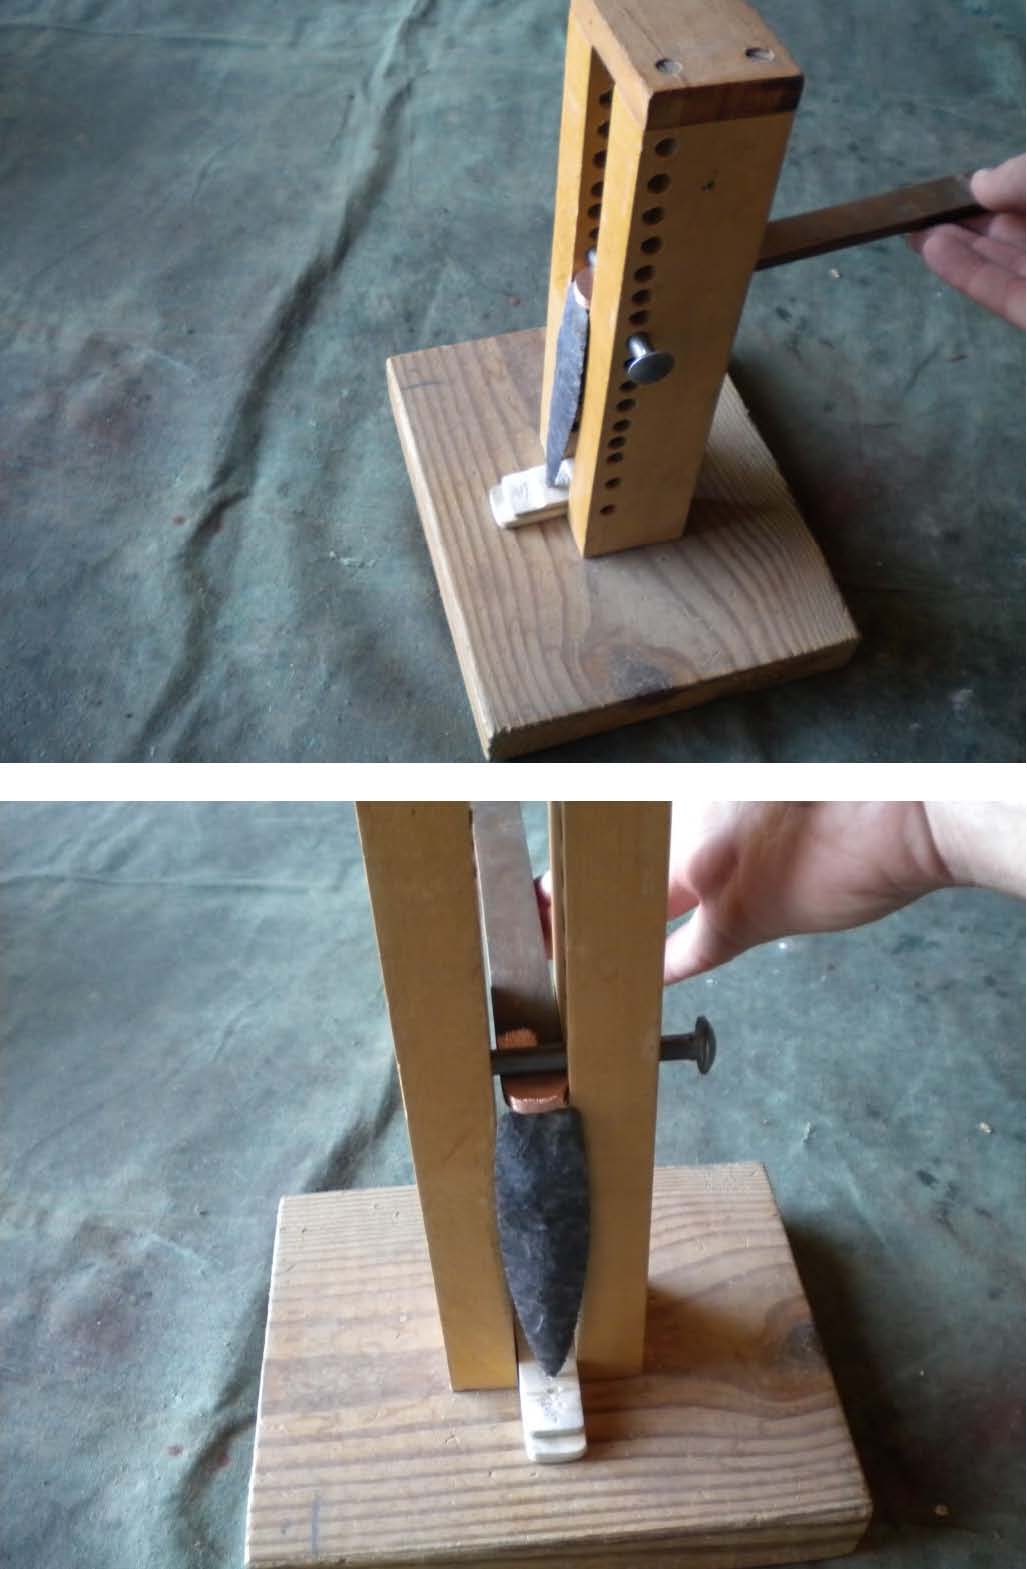
From http://paleoplanet69529.yuku.com/replyreply-294764, April 4, 2010, copied with permission
17
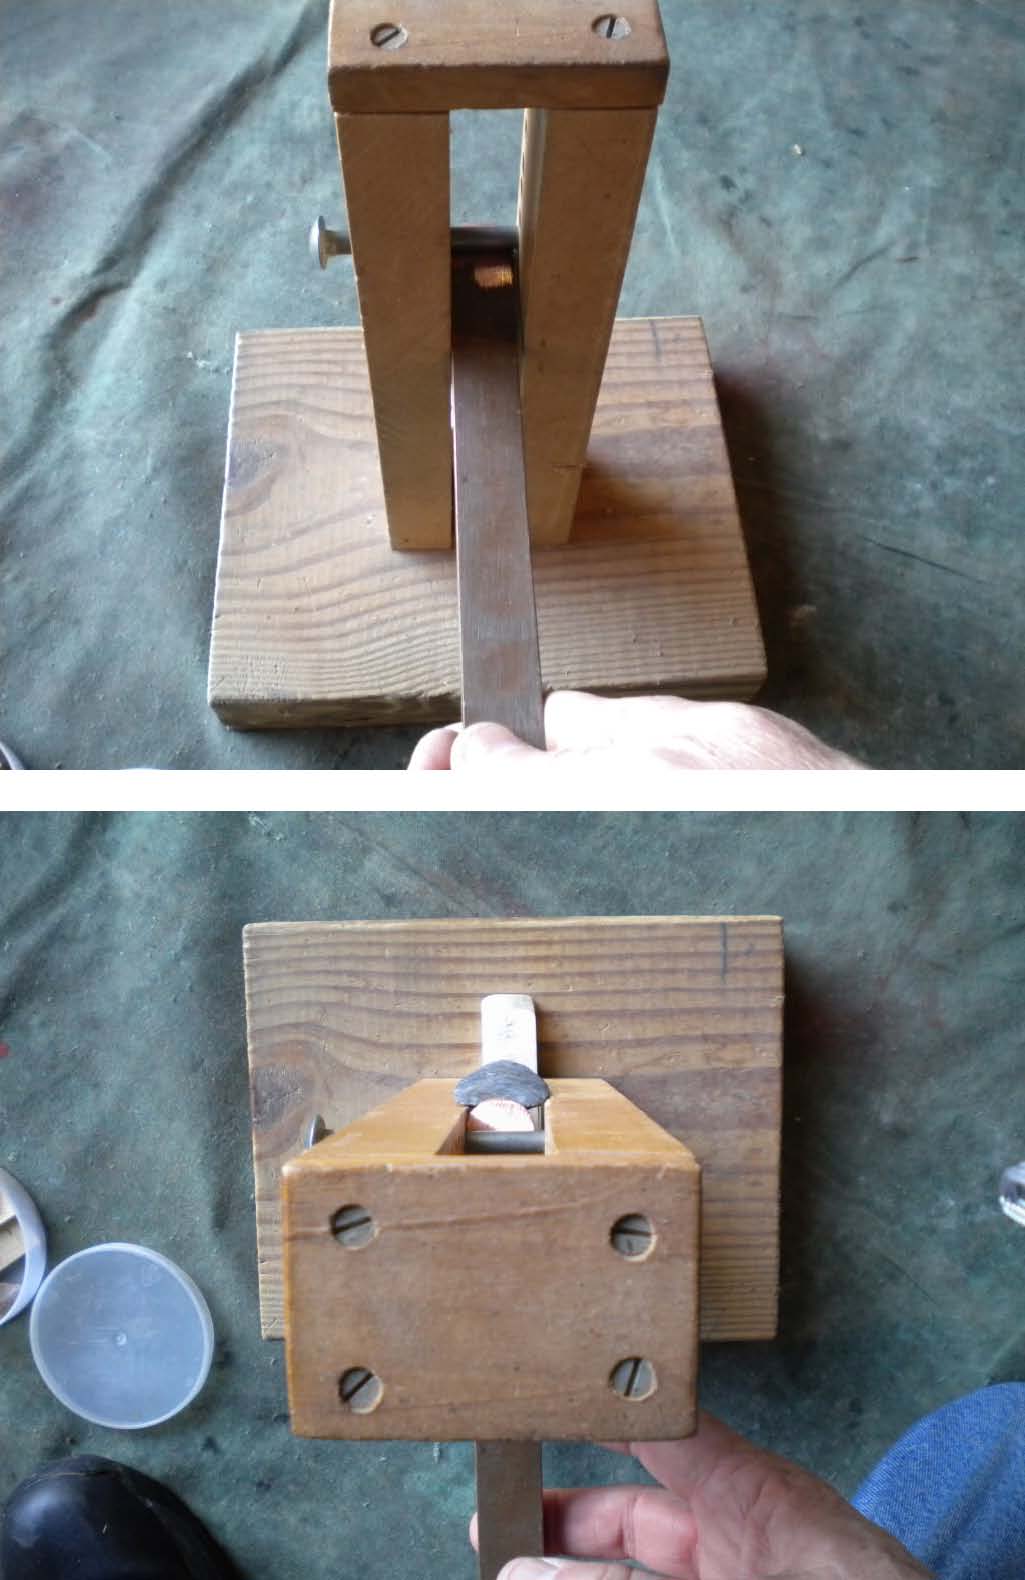
Tony Soars Fluting Jig
Posted by Richard Meyers (aka Twobear)
From http://paleoplanet69529.yuku.com/replyreply-294764, April 4, 2010, copied with permission
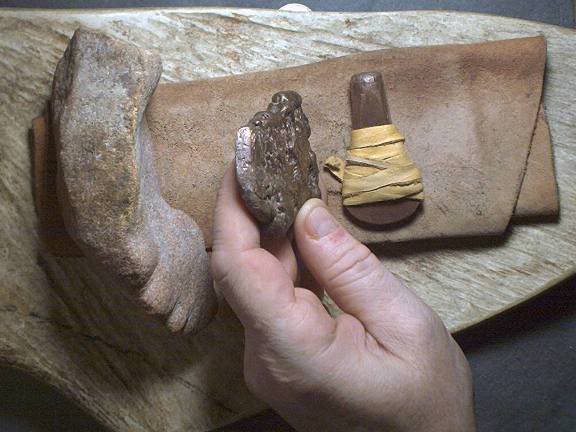
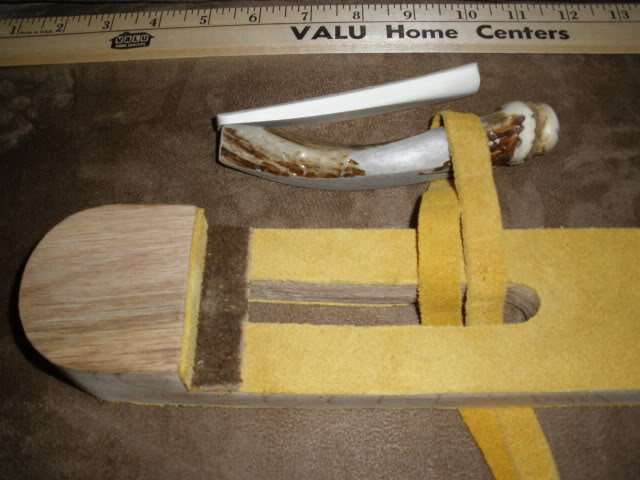
Rocker Punch Board
By Gary Abbatte (aka rhymeswithwhat)
I have interpreted the research of Dothager to construct a modern set of tools using similar physics and a blending the two Dothager tools into one practical set. The key to his Three Digging Stick Tool is the slot or space between the sticks and the use of a foot lever stick and thong to pull down a larger punch and hold it while striking. His second tool, a small split out branch tool, uses a tied down small punch. Both tools use leather pads or a pad over an anvil stone as an aid to locate the height of a preform or spall and set a striking angle for the punch and billet. Here is my tool set that combines the both lap tools into one with modern materials:
At the top is a large Cow Bone punch and a large Antler punch with a leather pull thong around it . The thong connects to the foot operated pedal stick for holding the punches firmly against the workpiece. The pedal stick and thong also holds the lap board very steady across the top of my legs when seated in working position and applying pedal pressure. The lapboard itself is oak, covered with leather and the other end away from the slot on the board is used for small punches that are tied down using a clove hitched leather strip. The underside of the board that rests on my legs is also covered with leather for comfort. The tools at the left are my striking tools: A Dogwood Billet, A Moose Tine Billet and a Limestone Billet. Small Antler punches can be seen at the right end of the board and one is fastened down in working position. Below the Foot lever stick is a variety of leather pads and an anvil stone.
A closer picture of the slotted punch board end.
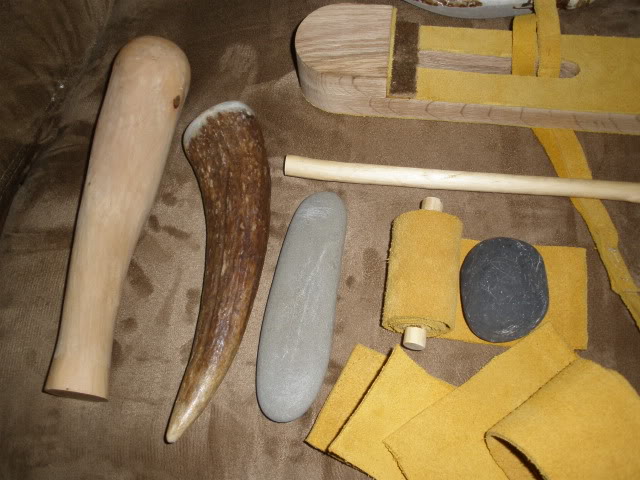
Billets, anvil and padding.
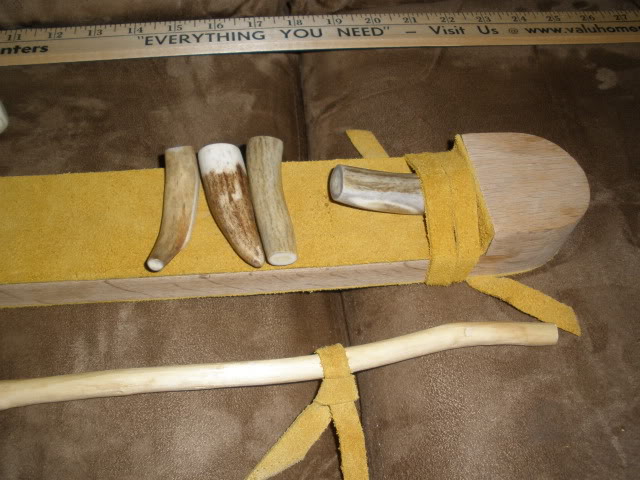
Small punches at the right end of the board.
Conclusion: This tool set has a lot of potential and I hope to gain skill using it. It is nice and steady on the lap and I can take large thinning flakes and shape preforms out of Onondaga with the set. If you are unfamiliar with rocker punch methods for Flint Knapping take a look at the Dothager video set and see how he uses his tools developed from his research:
http://www.spiritinthewind.com/mike_1.htm
Punch em out! [To see this tool in use, go to http://s30.photobucket.co...amp;current=punchvid.flv] From http://paleoplanet69529.yuku.com/topic/29696?page=1, April 4, 2010, copied with
permission
Converting a Pottery Kiln to Heat Treat Flint
by Mark Bracken
Read this DISCLAIMER Before you Proceed
Any person(s) using informations from this website constitutes acceptance of this agreement. Advanced electrical knowledge is REQUIRED to begin and or complete this kiln modification Person(s) using this information or any information offered by this web site are fully responsible for the transfer of this said disclaimer to any other persons user(s) of any informations offered by this web site. The user(s) assumes full responsibility for the proper interpretations and safe use of these information(s). Informations here are Not recommended for children under 18 years of age. Keep products and all related products away and out of reach from pets and children. Improper installation, care or use of products could result in property damage, Fire, electrocution, blindness, serious injury or death. Safety goggles are required during this procedure. Avoid inhaling fumes or dust. Must use proceed with proper ventilation. Must dress properly, wear shoes that completely cover the foot, Full length pants and a shirt are required during installations or modifications. Must wear heavy leather gloves accompanied. Consult your physician before you proceed if you suffer from any Breathing illnesses, bleeding disorders, tendentious, carpotunnel or any other discomfort before proceeding. If problems and or discomfort result, discontinue use and consult your physician. Do not consume alcohol, drugs or other mind altering substances during this procedure. If any product defects or excessive product wear are discovered, do not attempt to use. In no event shall the manufacturer(s) or retailer(s) of products used or sold on this web site be liable for incidental or consequential damages or for any other damages to the properties or person(s) of the buyer and or user. The recovery for damages resulting from any and all causes whatsoever, including, but not limited to, misuse, negligence, or strict product liability, will be exclusively limited to the replacement of the product(s) with respect to which losses or damages are claimed or to a refund of any purchase price paid for the products. If you wish to or have purchased products or used information(s) from this web site and DO NOT agree and or accept this disclaimer, DO NOT PROCEED. Proceed and or use at your own risk.
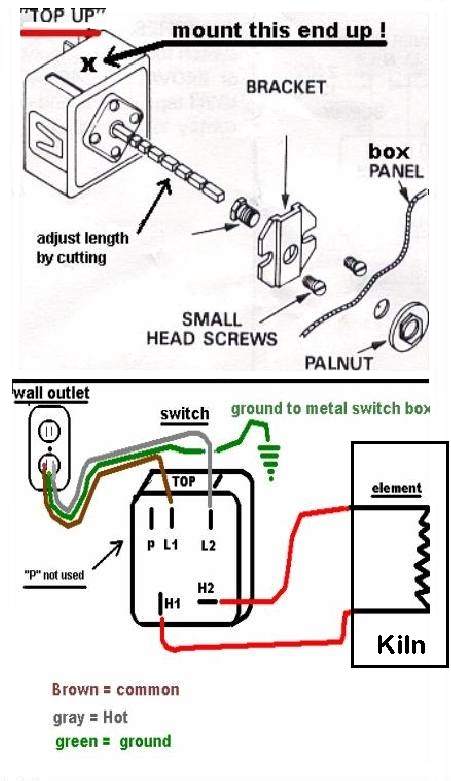
Switch Installation
Proceed at your own risk. This switch, Robertshaw 5500-135 commercial infinite switch, is designed for 120v. It can be purchased from any appliance parts store. I recommend the commercial grade switches. Each switch is to be used with one element ranging from 13ohms to 18 ohms. If your kiln holds one 5 Gallon bucket of rock then one switch will be enough. I have a kiln that holds 18 gallons of rock and I have three switches on it. The temps should not be allowed to exceed 800f. NEVER use the kiln on or near the "high" setting. Use caution when settings are near the "high" setting, the kiln could lock in "high" mode and will cause damage to your stone and possibly element(s). Never operate your kiln near any flammable vapors including, Glues, solvents, fuels or others . Infinite switches produce small sparks as they "toggle" in their operation. The switches have a dial with numbers from 1 to 6 on them with quarter and half marks on them. The dial settings are NOT temperature settings. For example: You must experiment with your kiln to find out what temperature #4 produces. It might be 375f. Make a chart and write down the final values of each setting. Be sure that you are allowing at least 24-36 hours for your kiln to max out at the dial setting you have selected. Don't become tempted to monkey with the dial when your trying to establish final values for a dial setting. Always fire FULL loads of material.
Read this carefully!!!
If you are unfamiliar with proper and safe installation DO NOT PROCEED
- Unplug all power before working on your kiln!
- Mount your switch in a metal box on the side of your kiln. Mount with good and safe clearance from any electrical connections to the element or switch itself.
- Be sure switch is mounted with the "top" indicator is facing upwards. See diagram below.
- Use a 14 or 12 gauge cord with ground wire. The best option is to make up a new one or remove one from an old appliance with a ground wire still intact. Washing machine, refrigerator, microwave ect… are suitable.
- Wire switch as shown in the diagrams below using quality crimp connectors. NO ELECTRICAL tape.
- Check all connections with a multi-meter to insure there are no "shorts" or "longs".
- Double check your element to be sure it is in the Ohms operating specifications of this switch as per diagram. Do Not Use old or original elements with this switch. They are not compatible.
- See diagram Below for details. Please note: the "P" connector is not used on this configuration!
- Use proper terminal leads on all connections, NEVER use electrical tape! NO connections should be located inside the kiln. All connections should be clear of any metal or conducting parts!
Operate the kiln safely!
1.Never operate kiln on a wooden or flammable or combustible surface. 2.Place kiln elevated on concrete blocks or metal stand. Do NOT set directly on any floor concrete or otherwise!
3.Keep kiln at least 20" from any walls or other objects at all times. 4.Use cement fiberboard on near by walls for an extra-added protection! 5.Use a "dedicated" outlet for each kiln switch on a 15-amp breaker. 6.Never heat-treat large blocks of stone. Stones could violently break apart. This could knock the lid right off a kiln ejecting VERY hot Fragments, creating a serious fire hazard! 7.Keep your kiln out of the weather, Damage to electrical parts will result. 7.Never operate kiln with flammable fumes, liquids, solids or vapors present. 8.Avoid heat-treating in your home or living space. Heating rocks can produce poisonous or harmful vapors, especially if cut on rock saw! 9.ALLWAYS WEAR A RESPIRATOR WHEN LOADING OR UNLOADING YOUR KILN!!! DUST FROM BRICKS AND ROCKS ARE DANGEROUS TO YOUR LUNGS!
-Mark Bracken
From http://www.flintknappingtools.com/heattreating_kiln.html, March 31, 2010, copied with permission
Dan’s Cave
© Long, Dan (2001). CHIPS: The Flintknapper's Publication. Vol. 13, #2 April. (unauthorized reproduction prohibited.)
Every man needs a place where he can go to "get away from it all" once in awhile, a cave to hide away in; a place for male bonding, making silica dust and washing it down. Whether it's a room in the basement, or, if a guy's lucky enough, a workshop out behind the house. A place, other than the local pub, where your wife will know where to find you......yet leave you alone to "create", knowing that you really can't get into any serious trouble "out there". This is the story of my "cave" and how it came to be.
I started knapping almost ten years ago now. Back then it was an outside only activity, done on occasion with a hammerstone and some chunks of Onondaga I picked up walking local fields.....oh yeah, and band-aids too of course. I was curious and interested, but the obsession hadn't quite kicked in yet. After some initial struggles (who didn't?) I found a copy of D.C.'s "The Art of Flintknapping" at the Buffalo Museum of Science. I was astounded.....I couldn't believe that such a thing existed. Boy, I thought, I've got it made now! After reading and struggling some more, I came to the conclusion that I just had to have somebody show me how to do this. At about this time I was introduced to Jack Holland, a gentleman well known in both knapping and archaeology circles......"Mr. Lithics". I pretty much just tormented Jack until he was kind enough to invite me to his home to give me a knapping lesson.....I guess it was either that or learn how to deal with a stalker! Jack showed me the basics, saw that I was sincere in my desire to learn, and decided that he should get me on down to meet Ken Wallace, a knapping legend here in the Northeast.
To make a long story, well, a little shorter. Ken and I became fast friends and I was put firmly on the road to learning this "lost art". Having a good teacher accelerated my abilities light years beyond where I would have been had I continued to struggle on my own. I still consider myself extremely fortunate to have met such a skilled knapper, and one who so easily and generously gave of his knowledge, so early in my knapping career.
The first time I visited Ken with Jack, as I sat in his home marvelling at the case after case of work that he put before me, I wondered where all of this magic happened. My question was answered as we moved outside to "the shop". Ken's shop was small, with a low, sloped ceiling and a wooden floor.....I could see small pieces of debitage imbedded in it and caught between the boards. There were things to see in every nook; arrows, darts, antlers, tanned hides, trade beads......I was overwhelmed!! The day was somewhat of a blur; it would have seemed almost dreamlike looking back at it later that night, had it not been for the paper thin Snyders point that I clutched in my hand....one of Ken's signature pieces and a gift to remember the day by.
Needless to say, I returned home totally pumped up and ready to knap. I looked at my little room in the basement, the one I shared with the boiler. Sure, it was plenty warm, but the light was poor and ventilation was non-existent (we tend not to open our windows much in Canada in the winter). Of course there was the rickety old garage, which was fine if it wasn't really cold....kept me out of the wind anyway. I didn't have to worry too much about the flakes on the floor either; we didn't put cars in the garage and it had a gravel floor, as the previous owners had removed the old wooden floor after repeated skunk infestations under it. This wasn't the most pleasant place to knap.....I needed a change.
My next attempt at a knapping studio brought me to our cottage, which is on a large river a short distance from the house. I got hold of a huge canvas tarp at a flea market, moved all of the furniture aside and covered the floor with it. This worked fairly well until Spring, when even after repeated vacuuming of the carpeted floor, my wife, who lives in bare feet as soon as it's warm enough to do so, started to "discover" small hidden flakes. Looked like I needed another plan.
It was time to tear the garage down before it fell down and build a new structure; not a garage but a combination workshop/storeroom. I attacked the garage, and to say that it was in trouble is an understatement; I took the whole thing down with no more than a crowbar....there was nothing bigger than a 2x3 in it!
I had designed an L-shaped building with the larger part of the L being the shop and the shorter part the storage area. After visiting the City planning department I found that I could build a much larger structure than I had thought, but I fought the temptation to eat up too much of the backyard (my wife loves her gardens), so I settled on a 16'x20' area for the shop and a 10'x16' area for storage. I knew that these nice even measurements would make construction easier too. I set to excavating for the floating concrete pad that the whole thing would sit on. Things got interesting almost immediately as I found a few flakes of aboriginal debitage in the soil just outside of what would have been the garage, so I know that it wasn't mine. It really wasn't a total surprise as we live less than two blocks from the Niagara River in one direction and about two blocks from a large tributary of it in another. I considered this an incredibly good omen, even more so than if I had found a point; knowing that prehistoric people had knapped right on that spot made it seem perfect. I even incorporated some of the flakes and a couple of my points into the concrete as we poured the pad.
The structure went up fairly quickly, thanks to pre-fab trusses and a friend who just happens to be a carpenter! We included two large windows on opposite walls on either side of the knapping area, and in line with the prevailing wind for flow-through ventilation. I wasn't just building a workshop for all of the things it might be used for.....I was building this thing with knapping as the primary consideration. I'd already decided where I would be sitting to knap; looking at the window that faces the house so I could see and hear my wife when she called me in for a meal. Being in the throws of a heavy knapping session is one of the few things that will cause me to forget to eat!! I've since installed an intercom to take care of these things in the winter months.
In addition to the two large windows for ventilation and light, I installed a 2'x4' skylight directly over the knapping area. If there is one piece of advice I would pass on to anyone considering building or modifying a shop for knapping, it would be to put in a skylight; it makes all the difference in the world.
It was finally time to begin finishing the inside of the shop; wiring, insulation, deciding where the workbench and power tools would reside, and in which corner the kiln would sit. Figuring out all of this ahead of time also helped me to distribute my electrical load evenly throughout.
Now, what to cover the walls with. I had decided to keep the ceiling open to keep the rafters available for storage (glad I did), but I did want to cover the insulation in the walls with something. I didn't really want to mess around with drywall....had to keep reminding myself that this is "just a shop". I looked around for an alternative and came up with a solution.....at work! I'm a lineman for an electrical utility, and our yard at work had a quantity of hydro poles that had outlived there usefulness. They are western red cedar from British Columbia, and some of the guys had started milling them up and making decks out of them, so I thought, "Why not panelling?" I had them milled to 3/4" thick and whatever width each pole provided. Once through a thickness planer to achieve uniform thickness and smooth them out (and bring out the grain beautifully), and they were ready to go up on the wall. They looked, and smelled, great!
The only wall I didn't cover with the planks is the one behind the woodstove, which is a wall of 100 year old bricks I picked up on my travels. Cedar is a fairly soft wood, which was evident after my "shop warming knap-in" when I found small chert flakes actually imbedded in the walls!
I next hung two eight foot, double tube flourescent lights on either side of the knapping area and a ceiling fan directly overhead (more air movement). Feeling that I'd covered just about everything; heat, light, ventilation, communication, storage, even a small beer fridge (gotta wash that silica dust down somehow), I realized that the only thing lacking was a bathroom. I hadn't run plumbing to the shop, and knowing that I had neighbours all around I couldn't use the method that we used at Ken's shop (out the back door). Not wanting to leave a toasty warm shop in January to run to the house, I had to come up with an alternative; so I dug a three foot deep hole outside, drilled a hole through the wall and ran some PVC tubing through it. The end of the tubing was at the bottom of the hole in the ground, which I proceeded to fill with alternating layers of sand, gravel and activated charcoal (for odour control). On the inside end of the tubing is a large funnel (the kind you use for draining your motor oil), and behind that on the wall is a small piece of plexiglass......a splashguard for those knappers who have trouble "hitting the platform". The first test run gurgled back at me....I hadn't considered the requirement of a drain vent. A small hole drilled into thePVC just before it disappeared under the ground solved that problem, and a"flush" from a jug of vinegar keeps things clean without pouring chemicals into the ground. The "bathroom" is even strategically located in a corner so that the user can be behind the door of the shop for a little privacy.
Adorning the walls are several cases of points that I've traded for or been given over the years, and several posters; The Story in Stone poster of course, Pete Bostrom's Clovis poster, and Val's drawings of the Wenatchee points among others. I even have an award that I was presented with at a knap-in a couple of years ago in Pennsylvania.....it was for being "The First to Arrive".....OK, so I got the dates wrong and went a week early!
Are there any things I'd change in retrospect? Yes, only two: First, I didn't know about "cold start" ballasts for flourescent lights. Seems the lights I hung (the price was right) are made for indoor use only; the air has to be at least 50 degrees for them to operate properly. This is remedied by getting a good fire going in the stove before I settle in to knap.....not a big deal. Secondly, I put a "brushed" finish on the concrete floor, which I thought nothing of until the first time I tried to sweep up flakes.....should've left it smooth. Again, this is taken care of by using a tarp to knap over, which makes clean up easier anyway. All in all I've been very happy with the result, and the knappers that have joined me over the last couple of years have given the place a hearty thumbs up!
If you're considering moving out of the basement or garage, or even modifying an existing space to be more knapper friendly, I hope that some of the suggestions I've put forth here will be of some use to you.
Oh yeah, and don't forget the vinegar!!
From http://knapper_dan.tripod.com/page2.html, April 4, 2010, copied with permission
Pictures of Dan’s cave from http://www.creeksideartifacts.com/DLKI/index.html
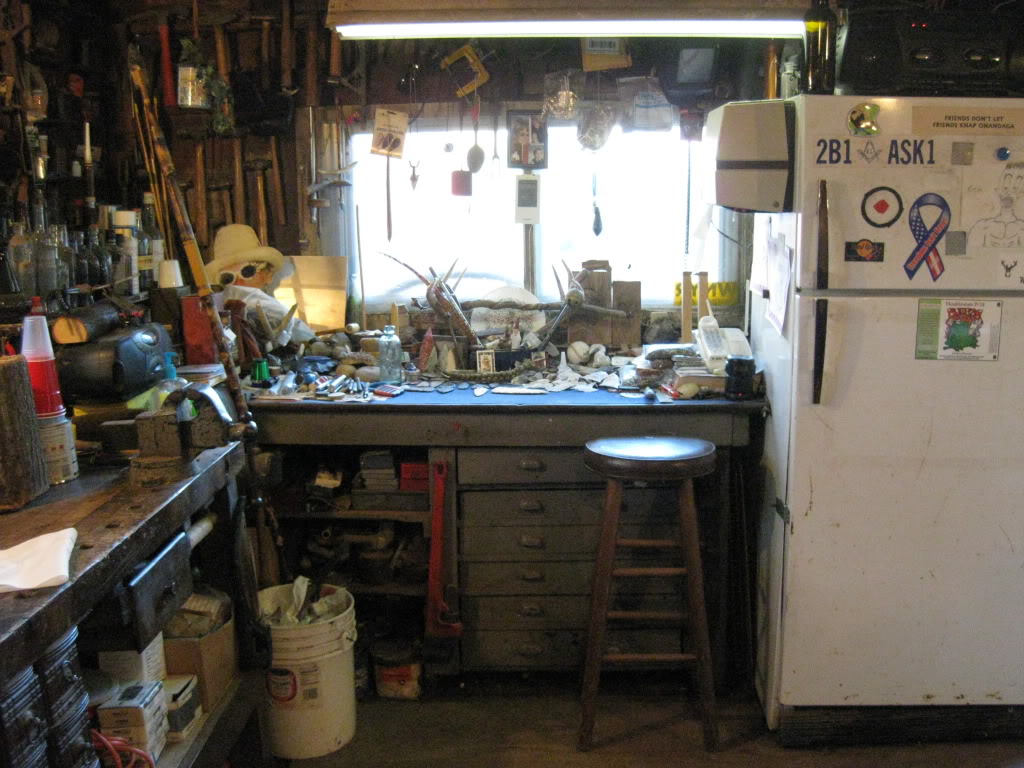
Paleoman52’s Man Cave
by Ken Wallace (aka Paleoman52)
When I started this thread last week I forgot to include my outside cave. Here are a few shots of where the magic takes place. Many of you have been here and will recognize it very well, for those of you that have not been here yet, I welcome you to stop by, My cave is always open to you. My only requirement is bring a rock with you, enjoy!
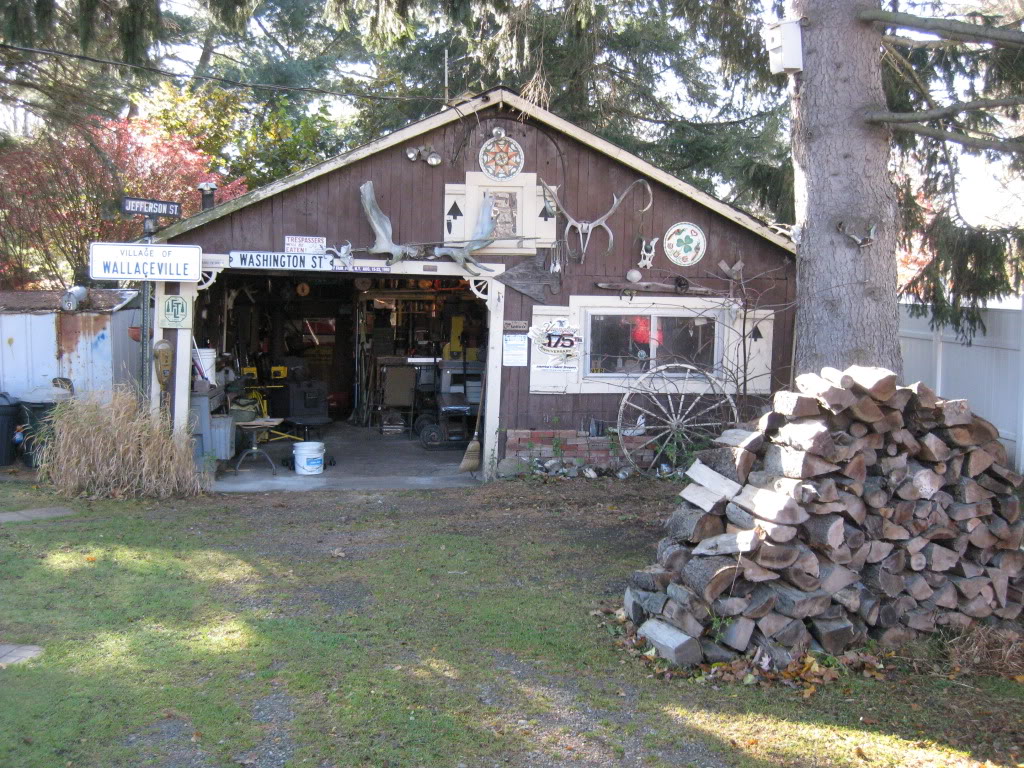
This is the outside of my Cave and it kinda looks like a cave with that big opening and all the different antlers hanging around the front.
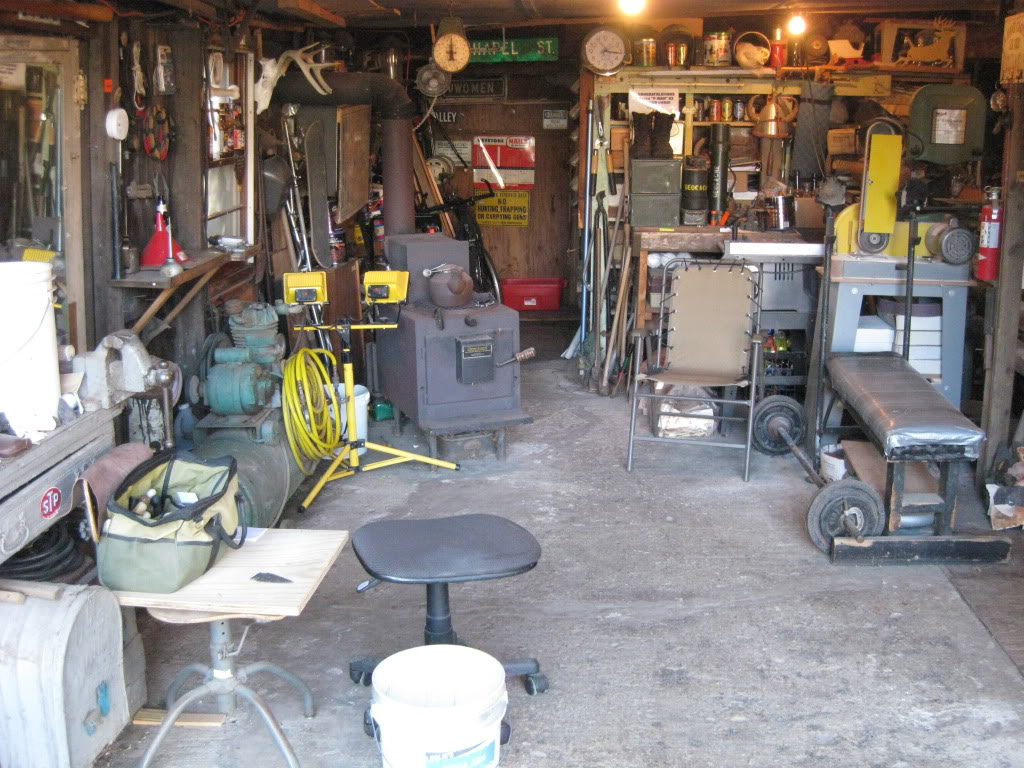
This is the area I like to sit during warmer weather and chip out my creations. It has a good view of the neighborhood and sometimes my neighbors spot me here and bring beer to share.
This is in the inner cave where I collect my finished pieces and grab cold ones out of the fridge to celebrate the successful completion of any point that doesn't break.

More views of the inner sanctum of my cave, this is organized but my wife considers it very messy, Hey I know where everything is, that all that counts.
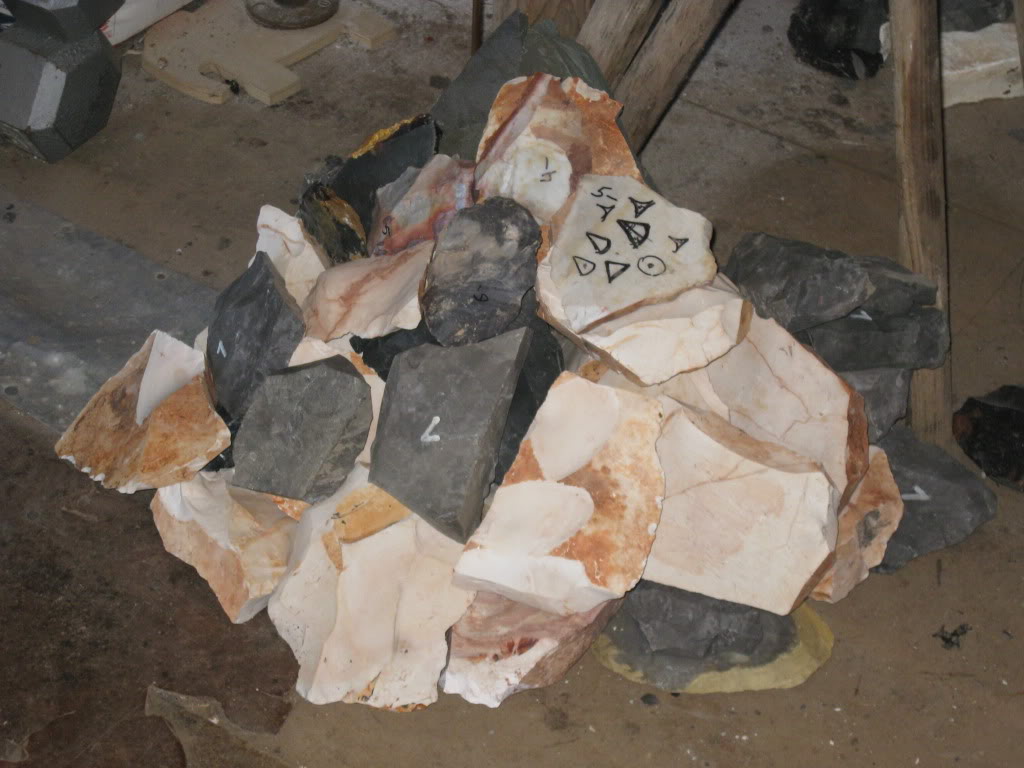
This is my meager rock supply that I have, when this gone I don't chip anymore until someone brings rock to the area, or I travel to a local knapping gathering.
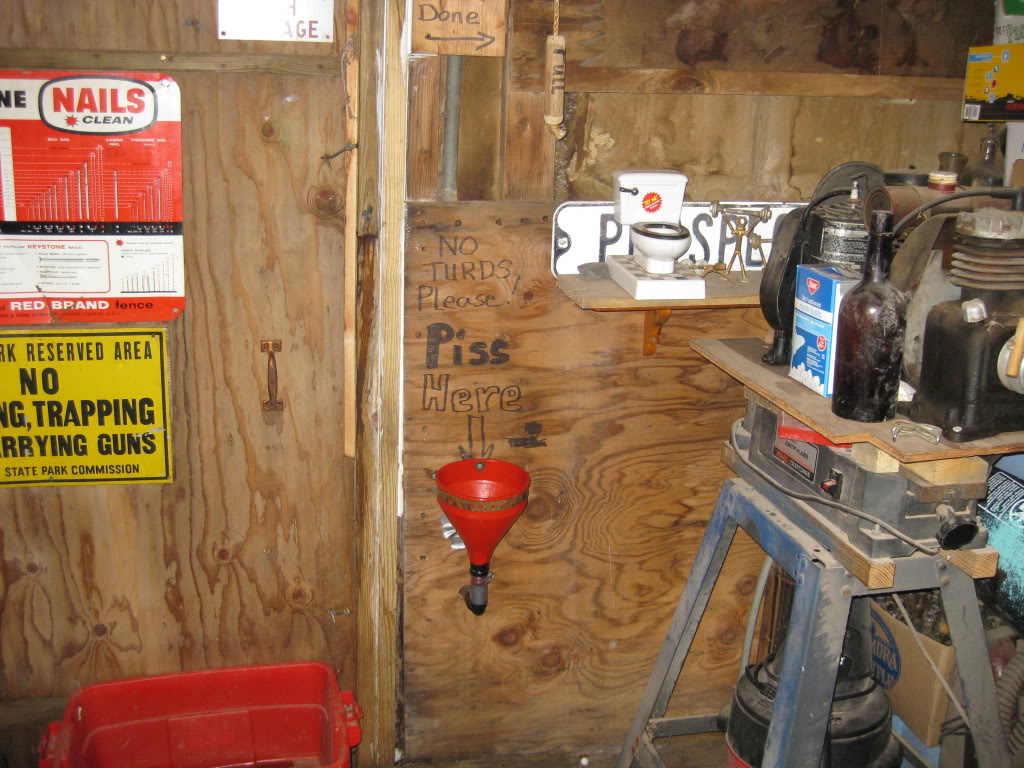
OK this picture kind of speaks for itself. Am I the only one brave enough to show "The Funnel"? This is one of the most popular places in my Cave and is visited at least one or 2 times a day by everyone when we gather for a day of chipping. I'm sure that all caves have different forms of this feature and recently I have rebuilt and improved my "Funnel" to handle more volume when my friend Mike arrives at my place after he drives in from Niagara Falls, NY. If you look closely you can see that there is a handle hanging from the rafter to pull if the need arises and also a miniature toilet on the shelf next to the"Funnel" that has a handle to trip and it is complete with full flushing sounds.
It may not be a place of beauty but it is my Cave and I enjoy every moment I spend out there, I hope you enjoyed your tour! -Paleoman52-
From http://paleoplanet69529.yuku.com/replyreply-261940, April 4, 2010, copied with permission