Flint Knapping: Percussion
Compiled/Edited by Michael Lynn
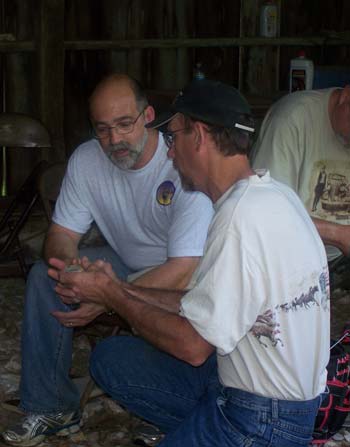
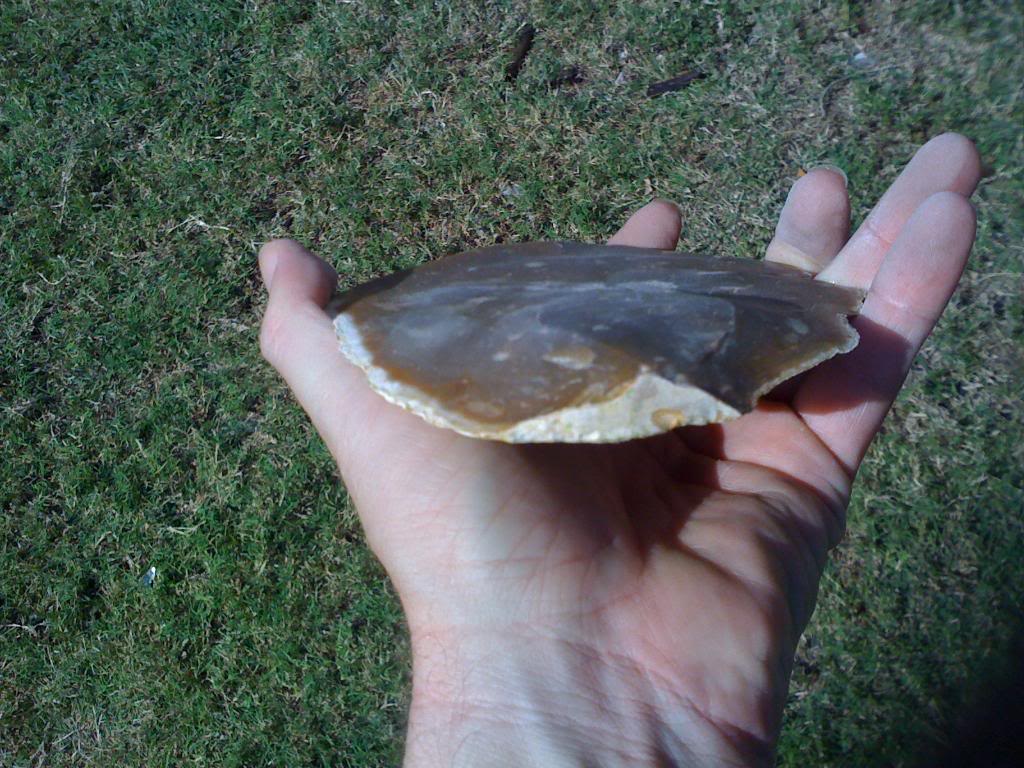
Photo of Tim Dillard teaching me at the Center for American Archaeology in Kampsville, IL
Dedicated to all those who have taught someone else about the art of flint knapping, especially to my primary teachers – Bruce Boda, Tim Dillard, Mike McGrath and Steve Nissly. This is my attempt to pay forward.
© Michael Lynn, 2010
Although the copyrights to the individual articles and tutorials in this e-book belong to the authors, I have copyrighted this collection. It may be freely printed, copied, posted on the internet and otherwise distributed as long as said distribution is free and appropriate credit is given to me and the authors. This e-book may not be sold for profit.
Flint Knapping: Percussion
Platform Preparation Variables in Bifacial Reduction of Flaked Stone Tools 3
by Errett Callahan at www.errettcallahan.com/piltdown.htm
Percussion Flint Knapping Tutorial 9
by Tom Sterling at www.sterlingsculptures.com
Abo Flintknapping Reduction Strategies 15
by Rick Hamilton at www.spiritinthewind.com
Using a Rocker Punch 24
by Lucas Nicholson (aka goose) at www.paleoplanet.net
Heavy Hammerstone Spalling – Tripod Setup 29
by Benjamin Eble at www.paleoplanet.net
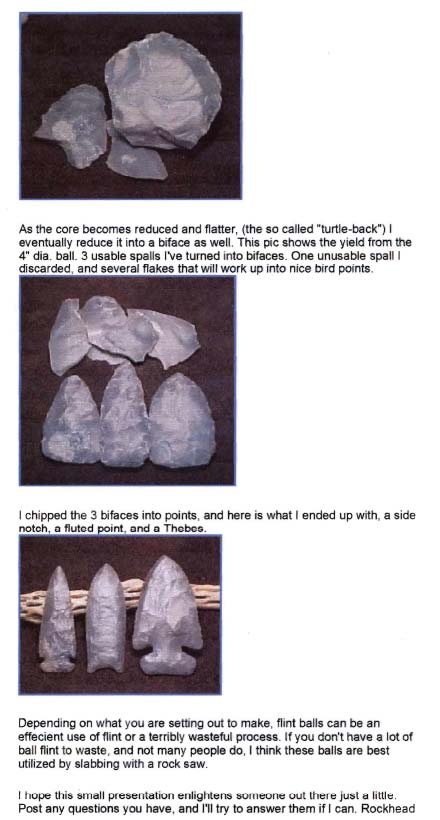
Ball Flint Reduction 33
by Gary Merlie at http://opalvalley.com
Preventing Broken Points 36
by Wyatt R. Knapp at www.onagocag.com
Some Talk about Angles 41
by Wyatt R. Knapp at www.onagocag.com
Why You Should Work the Ends and then the Middle! 43
by Wyatt R. Knapp at www.onagocag.com
Knapping on the Leg 46
by Wyatt R. Knapp at www.onagocag.com
Buffalo Hide as a Leg Pad and Preform Shock Dampening Tool 48
by Wyatt R. Knapp at www.onagocag.com
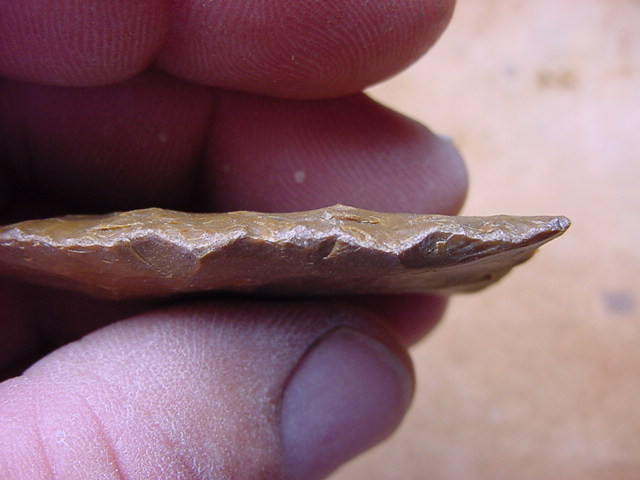
Platform Preparation Variables in Bifacial
Reduction of Flaked Stone Tools
by Errett Callahan
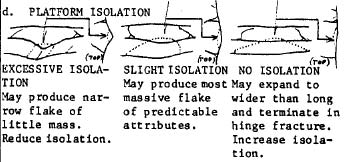
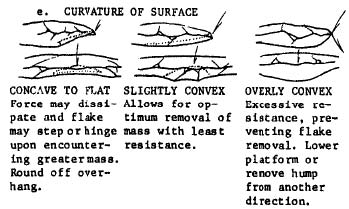
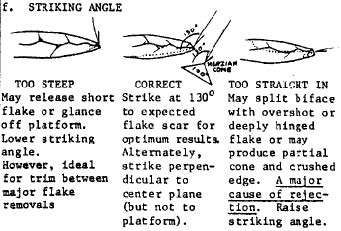
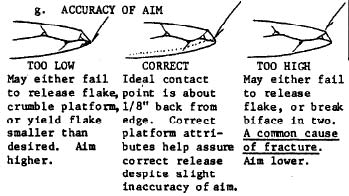
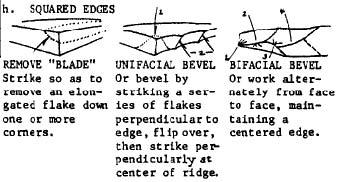
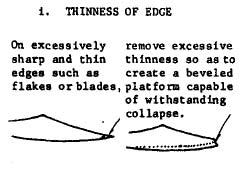
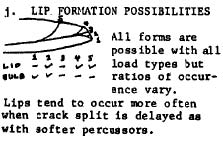
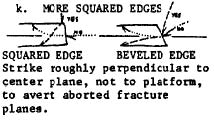
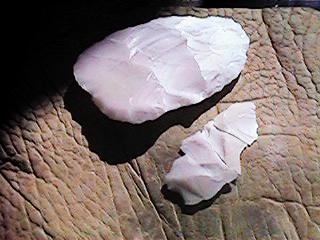
From: Table 11 in Errett Callahan’s (1979). The Basics of Biface Knapping in the Eastern Fluted Point Tradition: A Manual for Flintknappers and Lithic Analysts. Archeology of Eastern North America, 7 (1), 1‐180. [A CD containing this paper is available online for $45.00 at http://www.esaf‐archeology.org/publications.html.]
A revised and updated 4th edition of The Basics of Biface Knapping in the Eastern Fluted Point Tradition: A Manual for Flintknappers and Lithic Analysts was published in 2000 by Piltdown Productions, 2 Fredonia Ave., Lynchburg, VA 24503. [The “Basics...” is out of print for now. However, see more publications from Piltdown Productions at http://www.errettcallahan.com/piltdown.htm .]
Copied with permission from Errett Callahan.
Percussion Flint Knapping Tutorial
By Tom Sterling
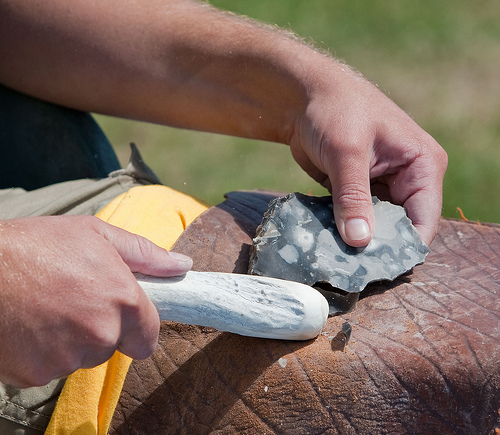
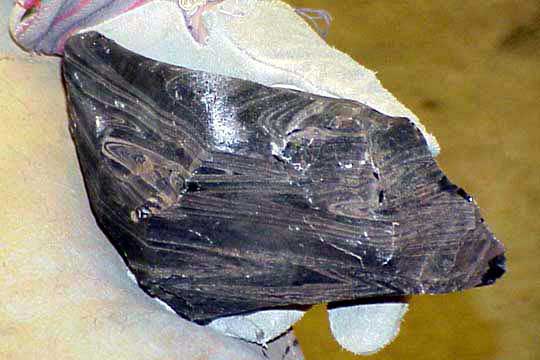
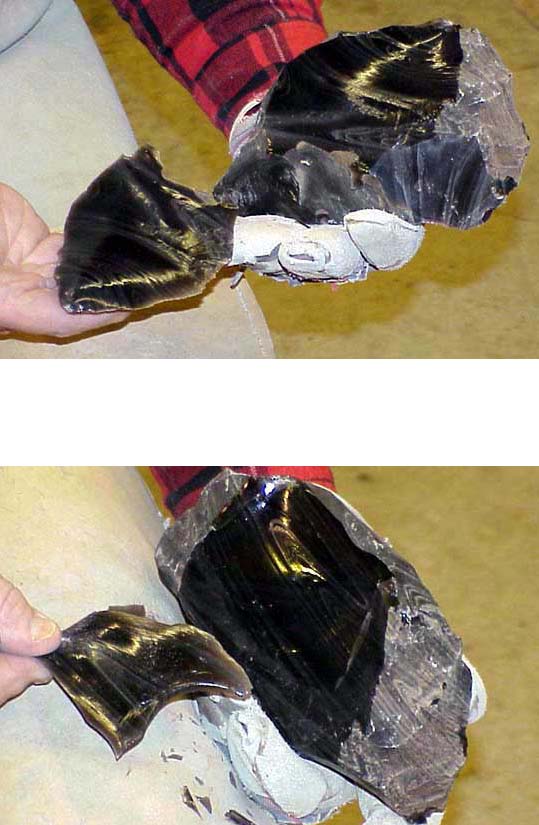
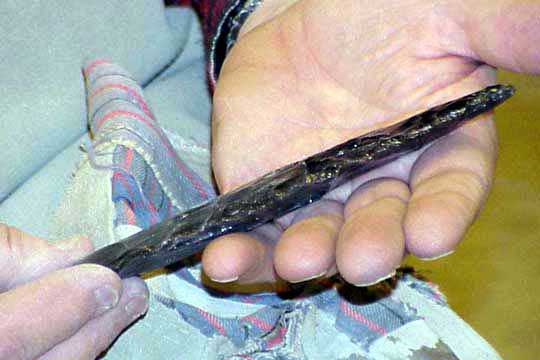
Here's the actual theory put into action. Doc Higgins is holding a piece of "Silver Sheen" obsidian (named because of the gray layers in it) that he's going to turn into a seven inch blade. This is a large, angular and knobby piece of obsidian, a naturally occuring volcanic glass. Native Americans favored this material for stone tools, using it whenever they could obtain it.
Note the heavy leather glove on his left hand, and the thick leather pad on his leg. The flakes he'll be removing are said to be the sharpest edge known to man. Because of the conchoidal breakage characteristics of obsidian, the edge produced is feathered out to an edge one molecule thick, far sharper than the best surgical steel.
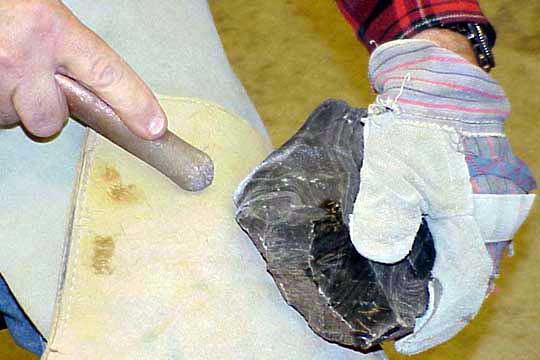
Here Doc's about to take the first in a long series of flakes from the obsidian. He's using a solid copper bopper here, and will be hitting about one third of the way up from the bottom of the edge nearest the bopper. The flake will detach from the underside of the stone. By controlling where he hits the stone, the angle he holds it, the angle he strikes it at, and the force of the blow he will gradually remove unwanted portions, resulting in a beautifully flaked blade with matching flake scars. He's been doing this since about 1990, and is self taught. I've (Tom) been doing this for about two years, and can produce blades only half the size Doc can, and not nearly as pretty. I also break quite a few. For me, a tragic case of theory wildly outstripping performance. While anyone can learn to knap successfully, truly beautiful work requires lots of practice and extreme dedication.
Here Doc has struck off the first large flake and is holding it in the position it came from. You can see the edges as dark black lines. After studying the rock carefully, he has chosen this particular corner because of the ridge you see running under his thumb. Flakes tend to follow ridges quite well, and a skilled knapper can direct which direction a flake will run.
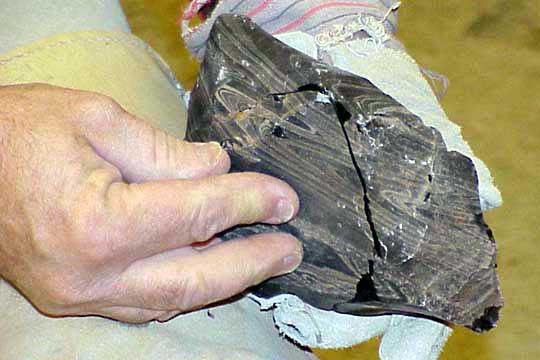
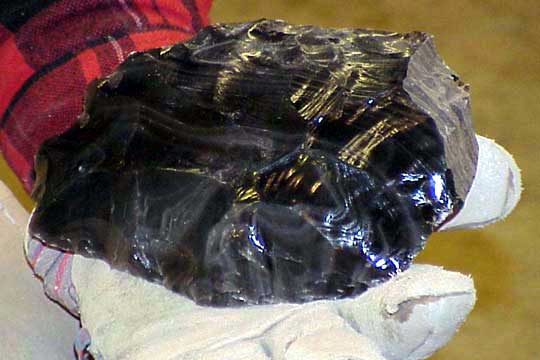
Here is the same flake removed from the rock. Note that it is a portion of that same spall cone we looked at in the beginning when a BB hits plate glass. Doc will simply remove more portions of similar cones at places (and sizes) of his choosing, until he ends up with the desired results.
Here Doc has removed the second flake, overlapping the first and along the edge ridge he created with the first flake.
Here's the rock after Doc has carefully removed almost all of the outer layers (the cortex). Note a little of it still remaining at the right hand end. The cortex is highly weathered and doesn't have that characteristically shiny obsidian surface. The rock is becoming more and more convex in cross section, which is Doc's ultimate aim. Flakes will travel very well over a convex surface, and convex blades have the best characteristics of both strength and sharp edge for durability.
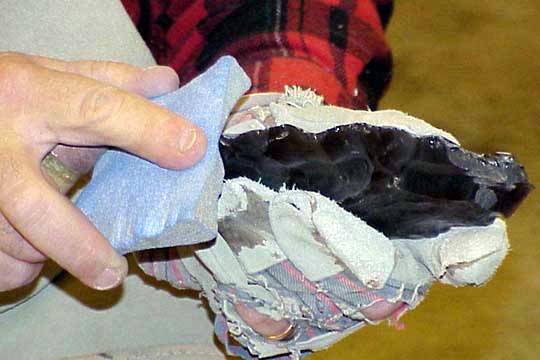
As the edges become thinner and sharper, Doc is paying particular attention to thickening the incredibly sharp edge by abrading it away with a coarse stone. Modern knappers use pieces of grindstone, where prehistoric knappers would have used coarse sandstone. Thickening the edge allows the force of each blow to transfer efficiently into the stone, resulting in a clean break, in the desired place, rather than allowing the sharp but weaker edge to crush. Crushing either fails to detach a flake, or only allows the break to travel part way into the stone, then break off leaving an ugly ledge which will be very difficult to deal with later (a common beginner's mistake). A not to be overlooked advantage to abrading the edge is the stone is much safer to handle. Freshly flaked edges are so sharp you can easily cut yourself and not even notice until the area around you begins to fill with red fluid!
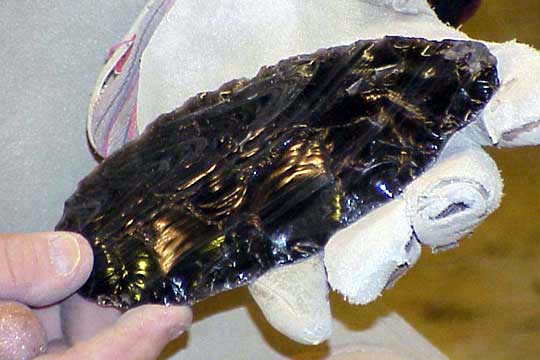
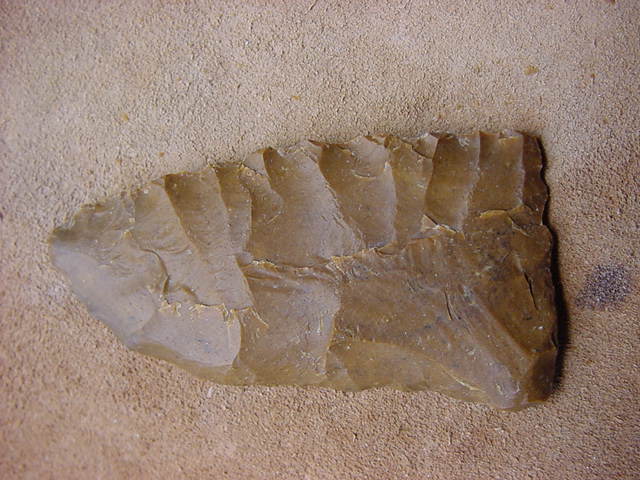
Here's the rock several series of flakes later, at a stage called a "biface." This is the stage at which Native Americans would have used to transport the stone for trading or taking home. Rather than carrying a lot of waste stone (remember, no pickup trucks back then), Native Americans would have reduced the raw stone to this stage, and carried them away in baskets. From this stage, a large knife blade or spear point could be produced at will, and most of the subsequent waste flakes taken off would be recycled as small cutting tools or arrow points.
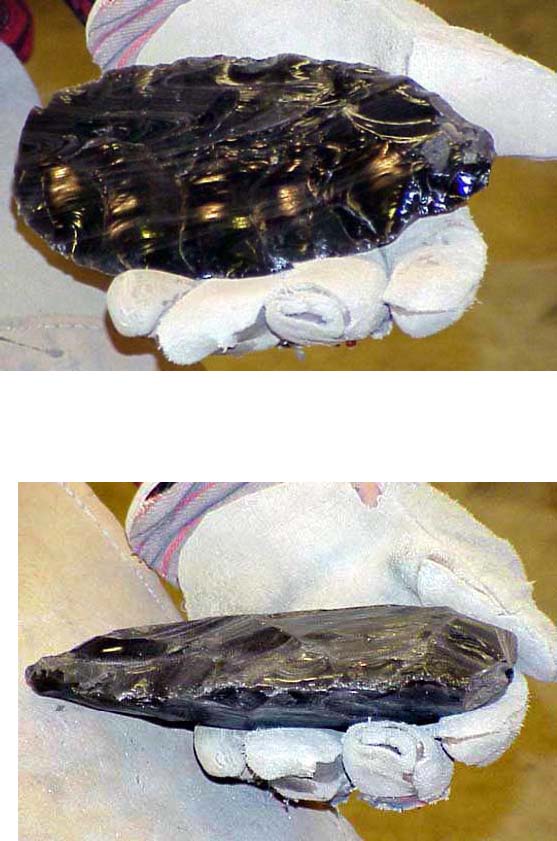
Here it is from a side view. At this stage, the rock is at least half the weight of the original.
Here's the next stage. Doc has continued to go around the edges and on both faces of the stone removing flakes to further refine the shape. He's been paying especially close attention to removing flakes to help thin the stone.
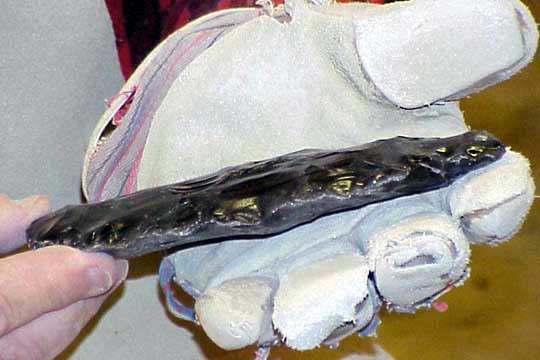
The same stage edge on. Note how much thinner it is.
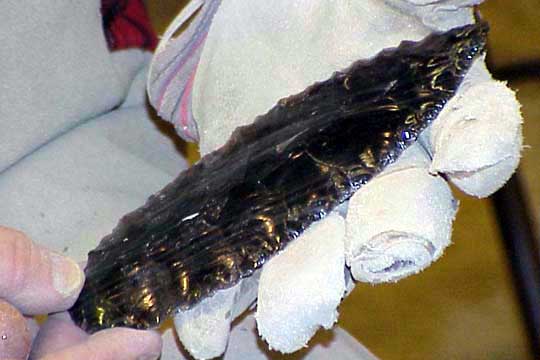
Several more rounds of thinning and shaping flakes. Note how much it is starting to look like a knife blade.
Same stage edge on.

More refinement. Doc's carefully programmed flake removals are starting to show up regularly spaced and matching with flakes from the opposite side. Knappers would refer to these as well spaced flake scars. Nicely patterned flake scars produce prettier blades, and are often considered a demonstration of the knapper's prowess.
Edge on. Only a few places to fiddle with and we'll be done.
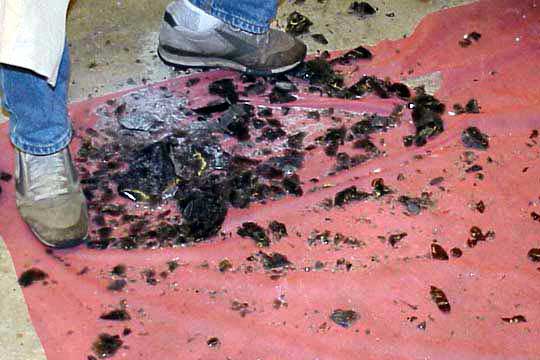
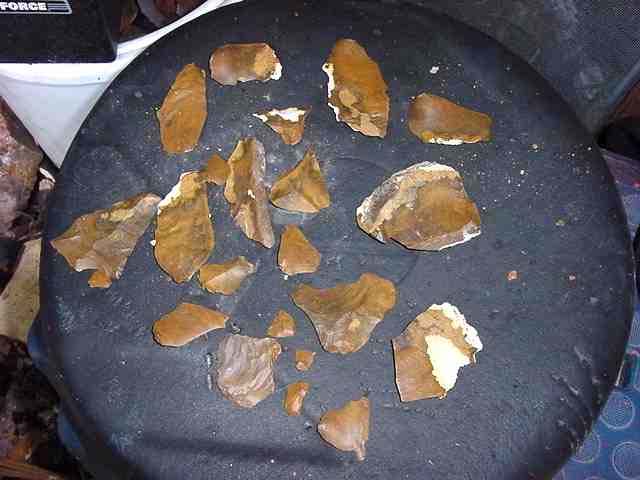
Here's the "debitage" (waste stone) pile left after finishing the blade. Many of these flakes are useable as cutting tools simply by abrading the side held next to the hand (for safety), or to be made into smaller knives, arrow points, drills, scrapers or other tools. This is also the amount of material a Native American trader would not have had to carry when he (or she) took out only biface stage material.
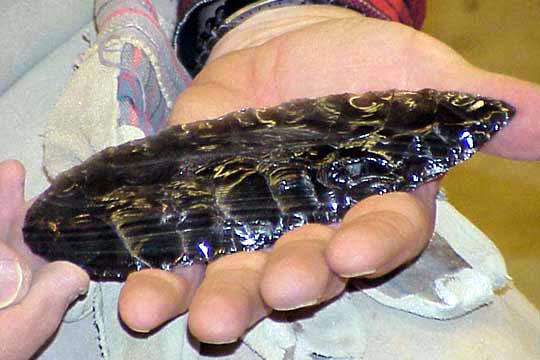
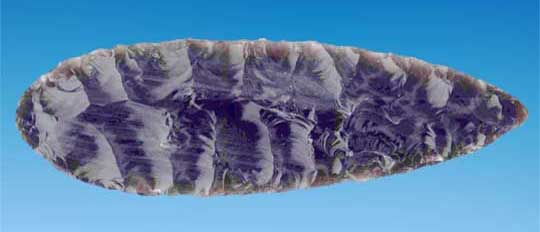
The finished 7 inch blade. Note the evenly spaced flake scars, matching with other scars from the opposite side, and smooth edges. A beautifully knapped knife blade, or with several knotches at the wide end, hafted onto a spear. All told, several hours of intense concentration, and lots of years of practice in the school of hard knocks, cuts, scrapes and jabs.
All contents copyrighted © 2002 | Tom Sterling
Tom Sterling PO Box 1621 Coupeville WA 98239
From: http://www.sterlingsculptures.com/Resources_folder/Knapping_folder/Knapping_6.htm, March 31, 2010, copied with permission
Abo Flintknapping Reduction Strategies
by Rick Hamilton Spirit in the Wind Enterprises
A photo essay on abo flintknapping reduction strategies and techniques utilizing hammerstones and antler billets.
Some notes by the knapper:
This particular piece of Niobrarite had a seam which came apart on me about halfway through the reduction process, resulting in a smaller biface. This triangular cross sectioned, tabular piece would have been very difficult to use a modern lapidary saw on with much efficiency. I picked this piece as it was triangular shaped, with two square edges, and cortex on each face, which allowed for a variety of reduction techniques.
I first edged the piece, than used longitudal primary flakes from the proximal ends to thin and flatten the piece. Then I proceeded to percussion flake removal from the sides. Efficiency is the key to a good reduction process. Your flakes should travel as long as possible. Bob Patten taught me to look at my debitage pile when I was done. If you have mainly large thin flakes you have done a good job. In my opinion this is one of the major differences in antler knapping as opposed to copper and some of the other materials.
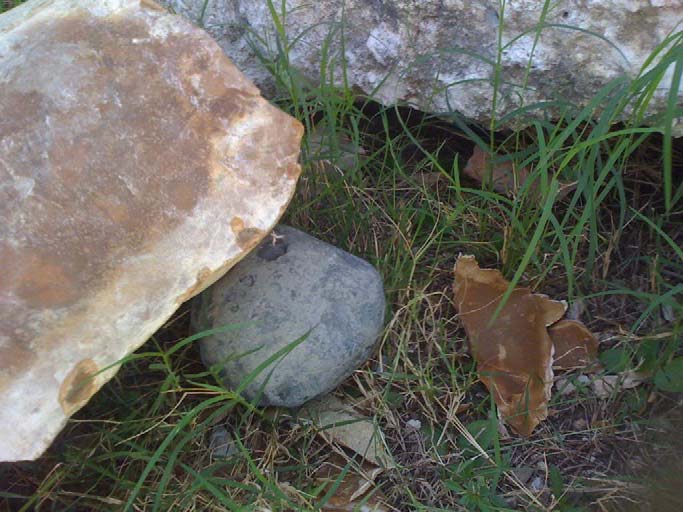
Most of the resulting debitage flakes can be used for arrow points and scrapers, or as cutting implements as is. Take a look at the last picture of the series to see the resulting debitage pile from this reduction.
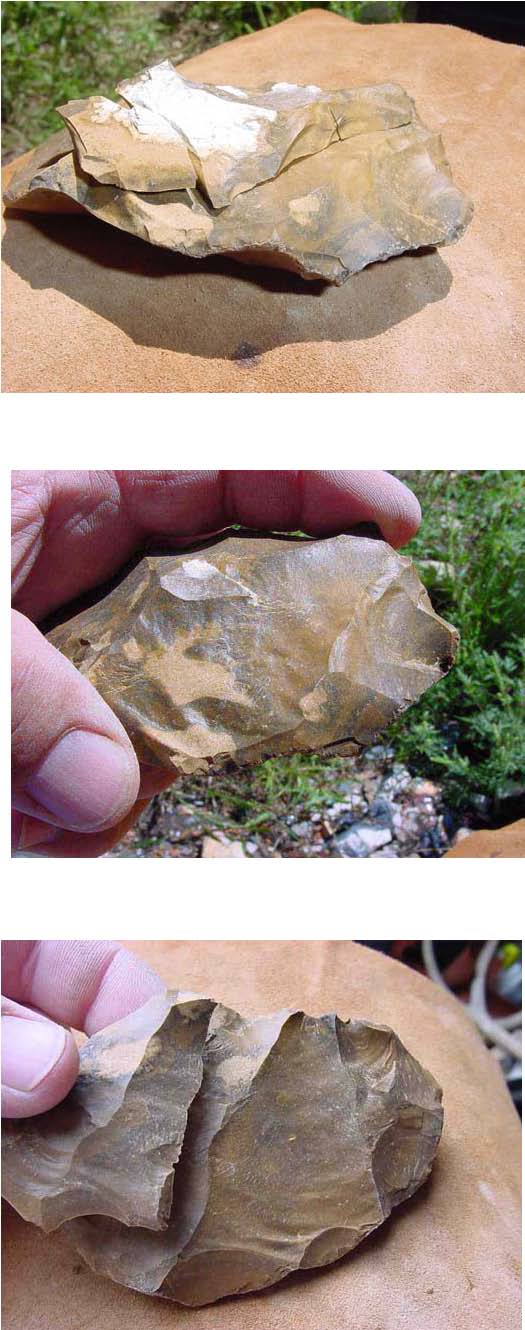
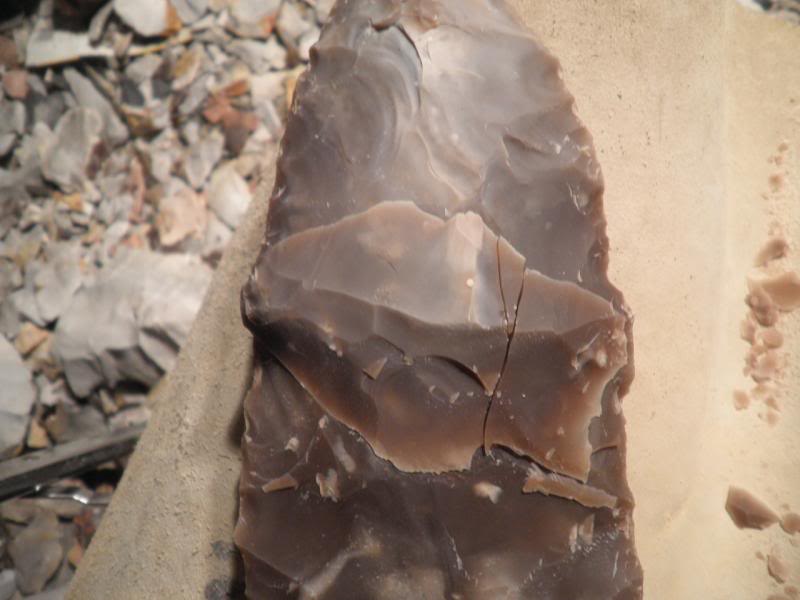
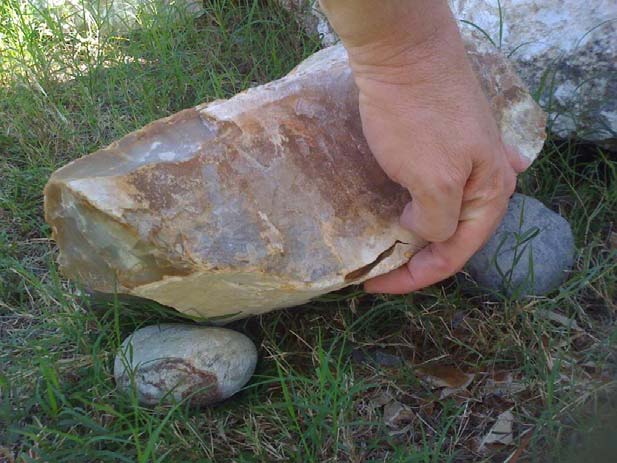
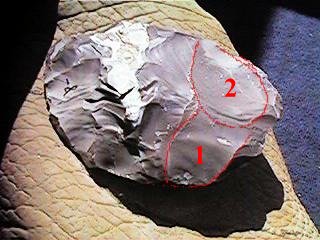
A tabular piece of Republican River material a.k.a. Republican, Niobrarite, Smokey Hill Jasper, Smokey Hill Silicified Chalkstone. The piece is approx. 2 1/2" wide, 4" long, and 1 1/2" thick. The piece is triangular in cross section
The opposing edge showing an angle suitable for a large platform for initial reduction flakes.
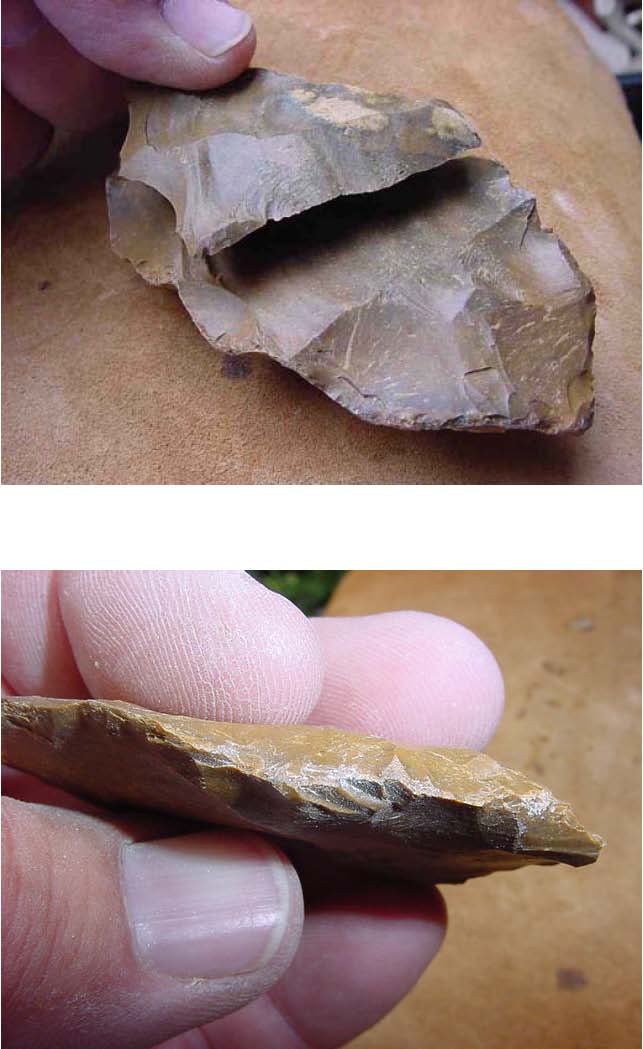
Stitching is the process of removing flakes alternately from each face to remove a square edge. A hammerstone was used at this stage.
The opposing edge with a flake removed to help reduce the square edge.
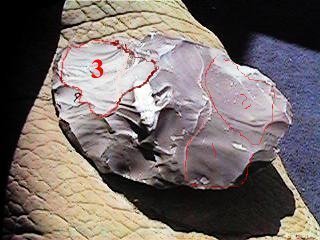
An end view showing the triangular cross section of the piece. A challenge to thin while retaining the width on a piece like this.
A second flake removed from the base (proximal) end to further minimize the square edge utilizing a platform created by the previous flake removal. (the basic technique for blade removal). The platform was on the right hand side of the flake with an antler billet being used.
A hammerstone was used to stitch the remaining edge after the reduction of the two flakes from the proximal end to minimize the square edge I used a whitetail antler billet and the platform shown to remove the flake and then put back in it's original position. This is the proximal (base) side.
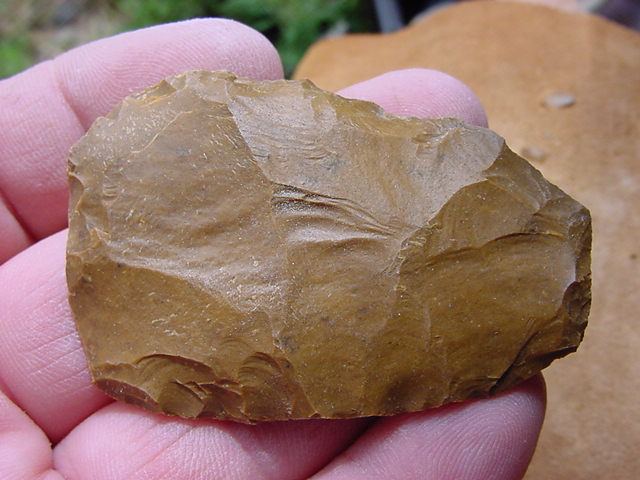
A top view showing the same flake and it's removal scar. Notice it removed the majority of the cortex and traveled nearly the full length of the nodule.
Side view of resultant flake, notice it's flatness which is what you want on primary thinning flakes initiated from either the proximal or distal (point) end.
Opposing face (1) showing a flake removed from the proximal (base) end. It also removed nearly all the cortex from this face very similar to side 1. The flake did break into three pieces but held together enough to travel the full length. Removing your initial primary flakes from the ends thins while also maintaining your width.
Top view showing the flake removed in the previous photo. Notice the chalky portion in the center. There is a seam in there that would cause me problems later on.
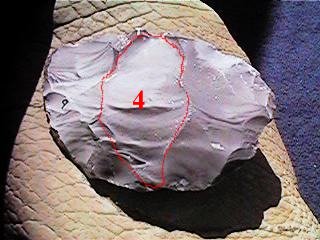
A full length or in this case a full width flake (coast to coast) without dipping into the ocean (overshooting). These major secondary flakes are initiated from the sides using some of the platforms created by the earlier stitching of the square edges. Notice the stitching remnants on the edge in the bottom of the photo.

The same flake from a different angle. The platform is on the right hand side of the flake.
This platform is too large for a billet, the piece would probably break. I used a hammerstone to remove a small flake from the bottom on either side of the platform, which created a smaller one that I then removed with a billet.
Initial pressure flake removal to help regularize edge and also to set up more platforms for more percussion flake removal with a smaller antler billet.
The biface after the target thickness has been reached. Percussion has been used almost exclusively to this point. I lost nearly half of the biface just prior to this due to a seam which is quite common in this particular material.
I prepared isolated platforms at this point such as the one above using an antler tine pressure flaker to regularize the edge and also to remove ridges and extra mass.
 Isolated pressure flaking platforms created by alternate pressure flake removal from each face while progressing unidirectionally down the edge.

The top half of the biface has been pressure flaked using the platforms shown in the previous photo, I now will create platforms on the bottom edge and pressure flake the remaining half of the face shown. Notice the percussion scar remnants on the bottom half.
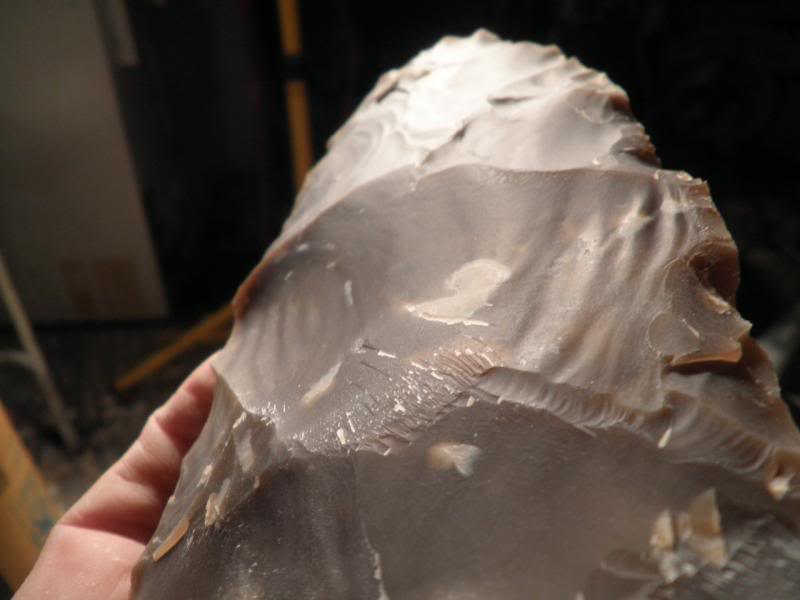
We now have a thin biface with nice convexity which could be finished with pressure flaking in a minimal amount of time.
All the primary, secondary, and tertiary flakes from the reduction process to this point. A few of the pressure flakes escaped on me, but for the most part this is the complete debitage pile from the reduction process. These would all have been used as tools or as blanks for points, scrapers, etc.
From http://www.spiritinthewind.com/abo_flintknapping_reduction_stra3.htm, March 31, 2010, copied with permission
Using a Rocker Punch
By Lucas W. Nicholson (aka goose)
Okay.....I took some pics using the rocker punch. A couple are a little blurry, but they should get the point across.
The first one is a pic of the flake I intend to take. My finger is on the platform I'm going to use and it points in the direction of the indirect blow. Notice the spur I left on the opposite face? That is something I do when I plan on getting an overshot. Or in case I get a shorter undesired flake I can remove the remnants from the opposite direction. The spur allows for correct contours and edge thickness and allows the flake a place to dive (when

This is just an on-edge-view of the biface and the platform. Notice how the platform is lowered and well isolated.
Another pic showing the isolated platform.......

This pic shows everything ready to hit. I am pushing to the right with my left hand and pushing to the left with my right leg. This amount of pressure needs to be adjusted
A pull away view just before striking.....
A side view showing approximate angle of punch placement relative to the notch.
A close-up of the notch placement. When seating the punch listen for a "click" and then visually check to make sure your punch is making a sort of spread out contact with the platform. This can be done by slightly rotating the biface angle back and forth until it is just right. What you don't want to do is have the punch just make contact with the very edge of the platform in the back of the notch. This will cause a portion of the platform to
The flake......
The flake scar.....
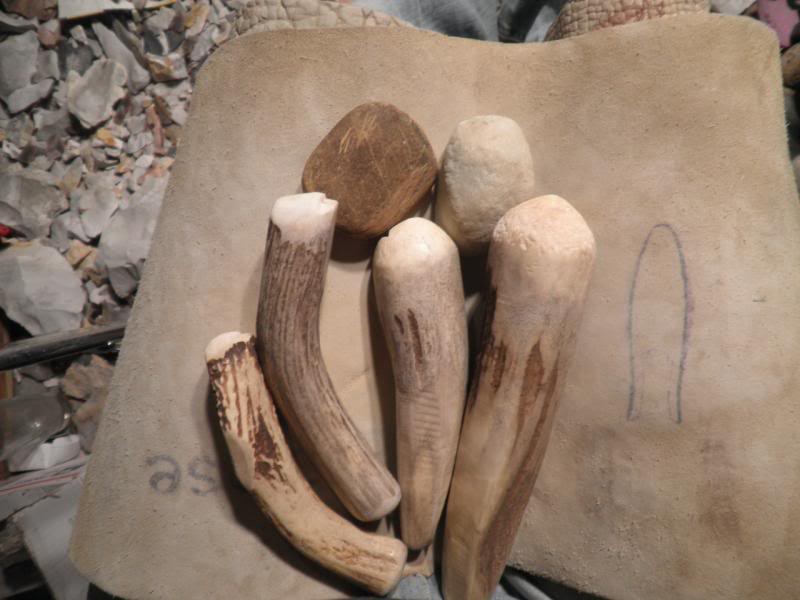
These are the tools I used. I would advise against using a carborundum abrader. It will only hinder your progress and allow you to cheat. For this method I used two hammerstones: one for abrading and a narrow one for finite isolation.
From http://paleoplanet69529.yuku.com/replyreply-278203, April 4, 2010, copied with permisssion
Heavy Hammerstone Spalling – Tripod Setup
By Benjamin Eble
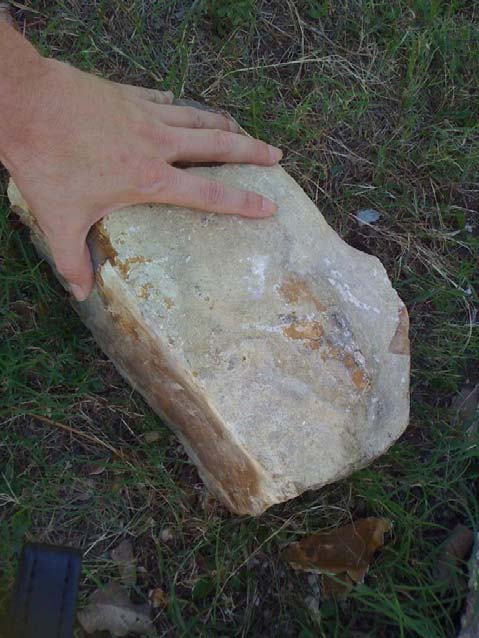
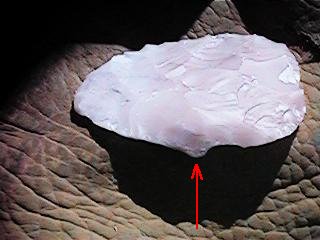
Large nodules are cumbersome to hold in one's lap. If they rest directly upon the ground, they can be very hard to spall. By creating a tripod, the large nodule can be elevated, and the back side of the nodule held down with a foot, while a really heavy hammerstone is used at a low speed to detach large flakes. Here is the nodule.
Here is the nodule in a tripod. (I am holding a flake in place by hand): Here is another shot of the other end, with the support stone underneath:
Here is a shot of the heavy hammerstone. It is not a "two hander". But, it is pretty heavy: With one foot on the back side of the nodule, and the nodule edge fairly low, I bring the heavy hammerstone down, and clip the edge at a low speed. A flake detaches. Here are the results:
Here you can see the corner of the flake, where I hit a fault in the rock. Too bad, or the flake would have been bigger.
The tripod support makes it possible to hold one end of the nodule down with one's foot. By using two support stones, it is possible to create support without a direct support that would impede the progress of the flake, while holding the nodule off of the ground. In my case, the flake hit a fault and stopped. Also, by using a really heavy hammerstone, and clipping the edge, it is possible to detach at low speeds, with less shock, shattering, etc. Also, there is absolutely nothing magical about my hammerstone. In fact, it was not a hammerstone until I used it as one. For people who have never used hammerstones, I hope that this tutorial is of a help. Ben
From http://paleoplanet69529.yuku.com/topic/32201, April 4, 2010, copied with permission
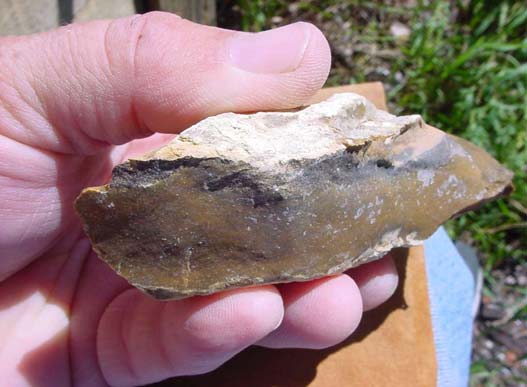
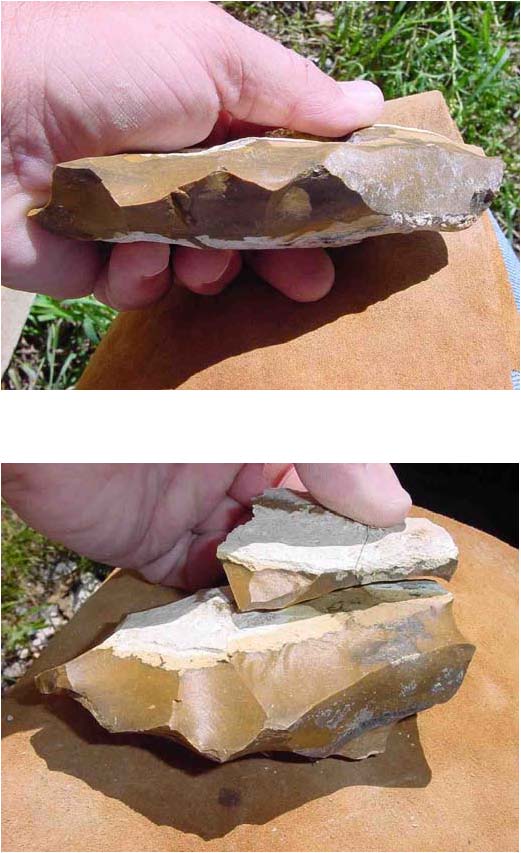
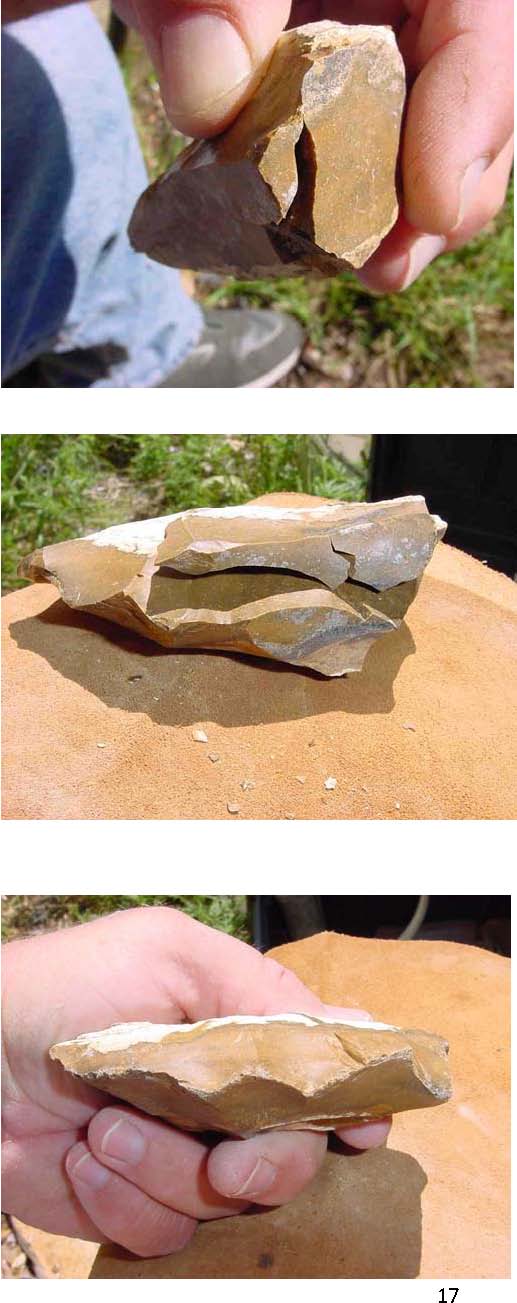
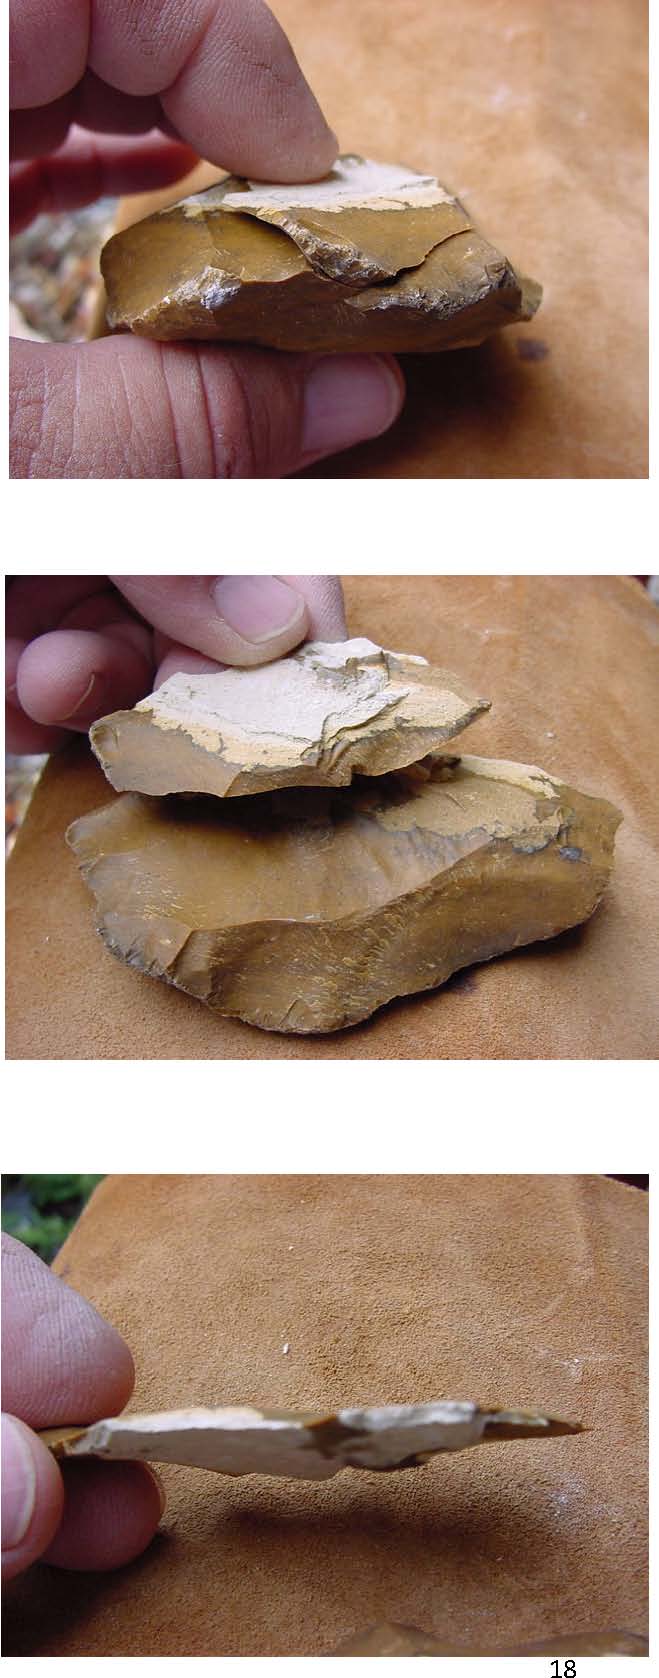
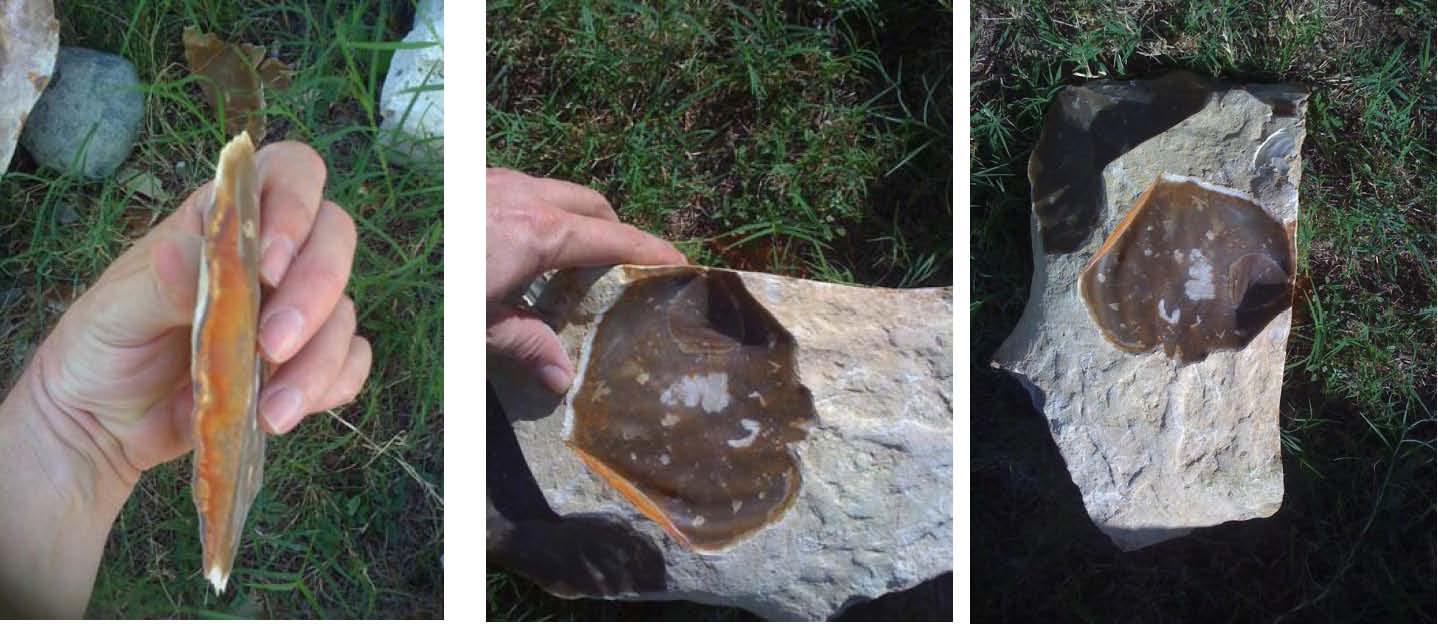
Ball Flint Reduction
By Gary Merlie
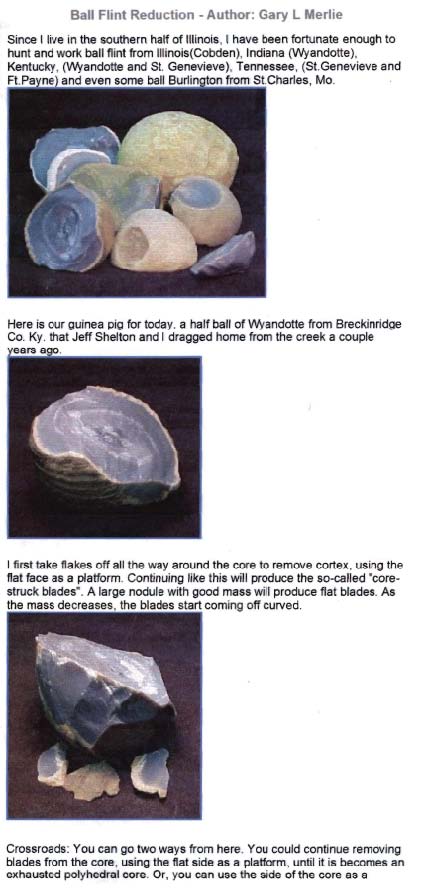
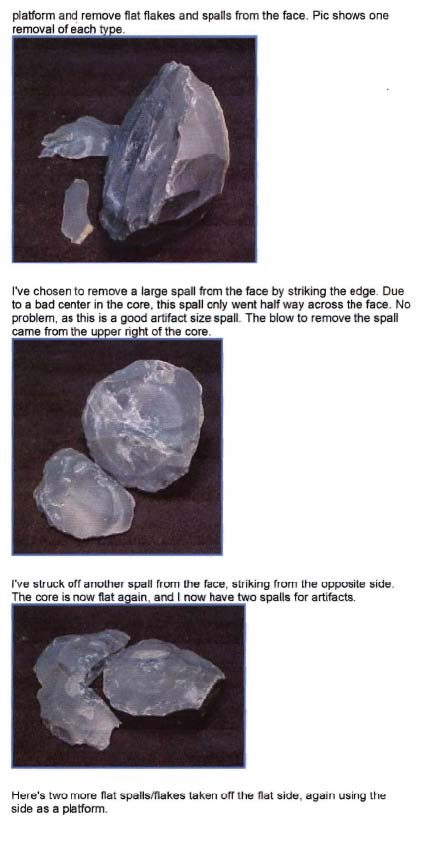
From http://opalvalley.com/gary/flint2.hml, May 2, 2006, copied with permission
Preventing Broken Points
© copyright 1996 by W.R. Knapp
It's so discouraging. Seems like everytime you get your points anywhere near a thin stage they break. They endsnap. They fold. Reaching your goal of thinner bifaces is just within your grasp and then it's snatched away in the blink of an eye. Well, I've been there. But I can honestly say that ever since I learned the things in this article, I haven't broken a single point while billet thinning as long as I didn't rush things and I took the time to apply the techniques. That brings up an important thing to remember. There aren't any shortcuts to creating those beautiful points. Besides, you don't want to hurry. Flintknapping is fun. Relax and concentrate on really seeing what the stone needs and you'll be happier with the results.
I learned the techniques described here from my good friend Jerry Ulrich, a knapper from Battle Creek, Michigan. After watching me knap a piece down to a 4 to 1 W/T (width to thickness) biface and then break it, he told me that there was no reason to ever break a point that had gotten that far. But I needed to memorize some things and practice them until they became second nature. I did what he said and he was right! I'll list them for you and then we'll discuss how to achieve each one of them. Here they are:
PLATFORM HAS TO BE BELOW THE CENTER LINE ISOLATE THE PLATFORM ABRADE PROVIDE SUPPORT DAMPEN VIBRATON
Every time you are going to strike a platform make sure you have done the things in the above checklist.
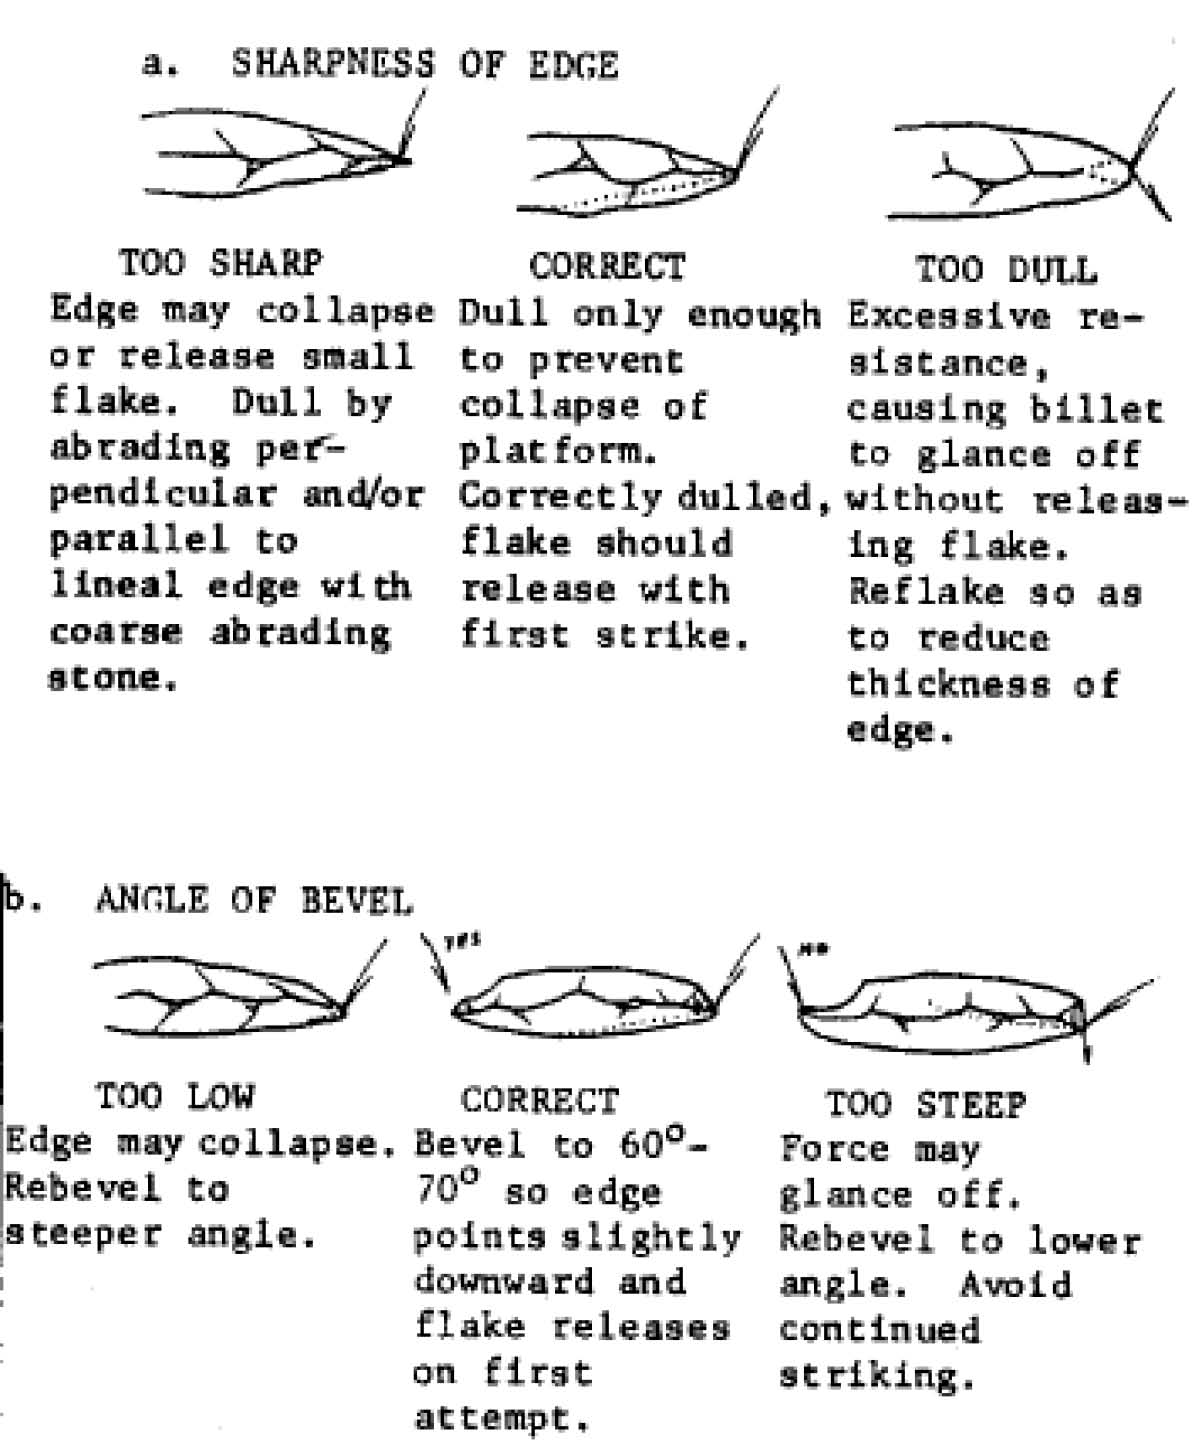
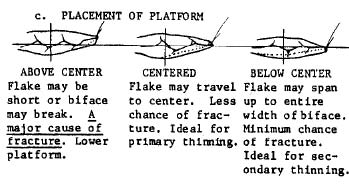
Platform Is Below The Center Line
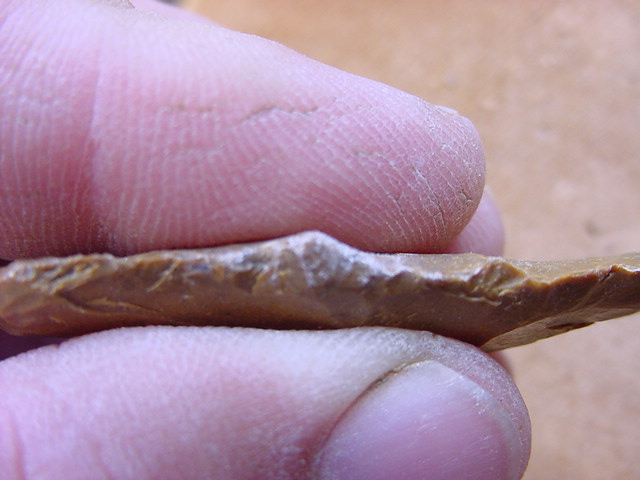
First thing is to make sure that the place where your billet is going to connect is below the center line. When you hit below the centerline, a flake comes off. When your preform is thin, and you hit above the center line, it is almost certainly going to break. As the preform gets thinner, it's very important to take a little time and really look at each platform you make. You need to make sure they're right. Do what you can to make every platform as perfect as you can and you'll be rewarded with more predictable results. As you gain experience you'll find that there are times where you might spend five minutes just preparing a platform but the results are well worth it.
Isolate The Platform
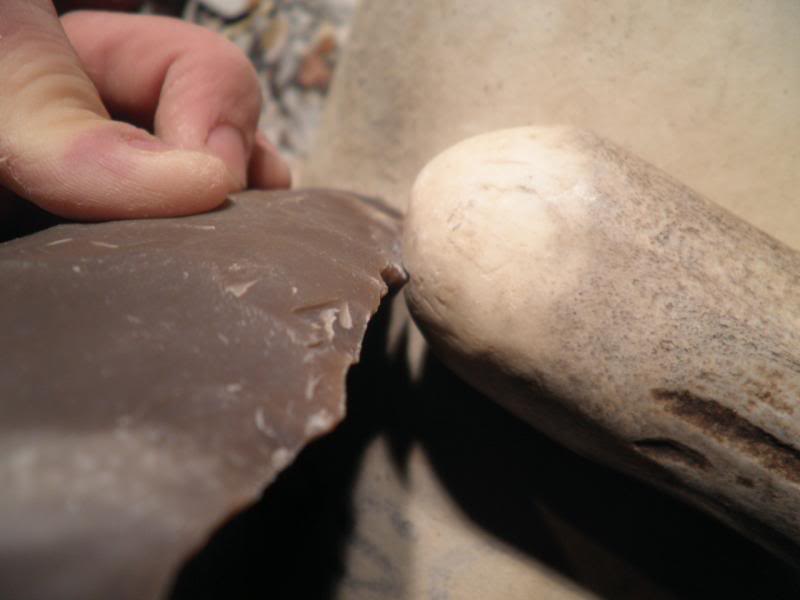
Isolating a platform allows your billet to connect with certainty on the exact spot you wish to hit. It allows for concentration of all the force from that blow into that one spot. When using a moose-antler billet, striking properly abraded and isolated platforms results in large, fan-shaped thinning flakes. It's a great technique--especially for beginners.
The above picture shows an isolated and abraded platform ready for the billet. I made this one a bit exaggerated so you can get the idea, but it will still work. You can see that some of the material has been removed from either side of it so that the billet will only catch the platform. Look at it! It's right out there beggin' for it. Don't you just want to hit it? Wait a minute, OK? Let's take care of a couple more things first.

Another example of a platform set up on a ridge. The platform has to be at an angle less than 90 degrees. The relative dimensions of the platform, ridge, and preform in this drawing have been exaggerated for clarity. As the preform gets thinner the platforms get smaller too. Everything gets more subtle as you near the final form.
Abrade
We talked a little about abrading in the last section. You also saw a picture of how our platform looked after it was abraded. We'll use this section to explain why we abrade.
Abrading is the rosetta stone of flintknapping. It's the "Eureka, I found it!" So many people who had to learn flintknapping by themselves have told me that when they discovered abrading they advanced "light years." There's good reason for this. An unabraded edge is sharp. It uses up the shock from the billet before it can do any good. Without abrading you end up with a crushed edge and a myriad of step-fractures. Abrading dulls the edge so that it has the strength to hold up under the force of the billet. On top of that, because you're hitting a blunted edge, the shock wave travels cleanly on through the stone. If you pay attention to the angle at which you are holding the piece, a long, wide, thinning flake results.
Here's another trick. Abrade a little on either side of your platforms. Then if somehow you do miss the place you intended to hit, at least you'll still remove a flake rather than damaging the edge.
Provide Support And Dampen Vibration
We're in the home stretch now. The thinner your point gets, the more important these last two rules become. Here's how you hold a preform so as to provide support and dampen vibration when you hit your platforms.
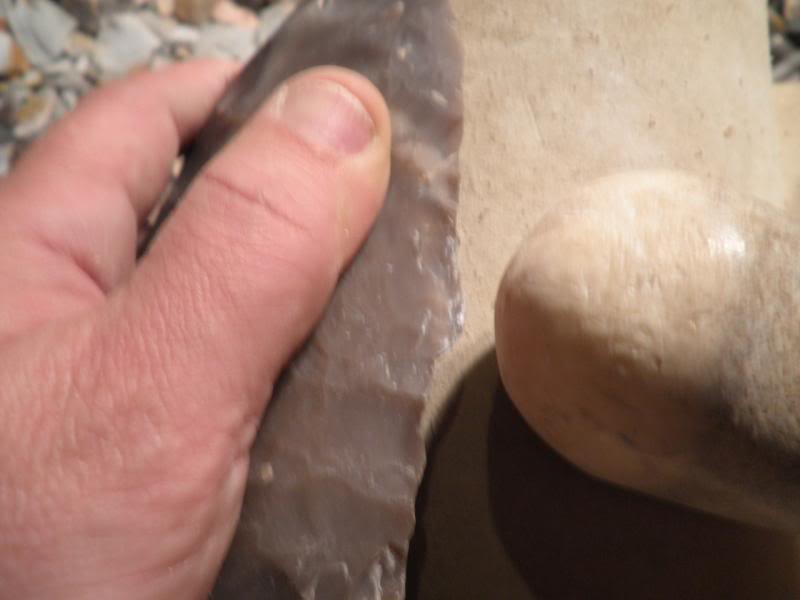
The picture on the left shows how the bottom face of the preform is supported by the fingers. Only the finger that the knapper may be using to apply force for "pulling" a flake is actually applying any kind of real pressure. Mainly the fingers are there to support the whole point so that it holds up to the force of the strike. They also assist in dampening vibration. By the way, don't let your thumb clamp down and put force on the middle of the point. Let it rest closer to the back edge of the piece. That way it doesn't stop the shockwave halfway through and break the piece.
You will notice from the pictures that I like to use a piece of real leather chamois to protect my hand during knapping. I like how it's easier and less bulky to use than a glove and because it's so thin I believe you retain some of the "feel" that a bare handed knapper has. I can't explain this "feel". But you will know what I'm talking about when you "pull" enough flakes and feel the sensation of the shock from the releasing flake. In addition the leather supports the piece in the areas between your fingers and further helps reduce vibration. You double or triple the thickness in areas of the hand where an edge is seated. I strongly recommend protecting your hand-especially for beginners who are getting used to how knapped stone behaves.
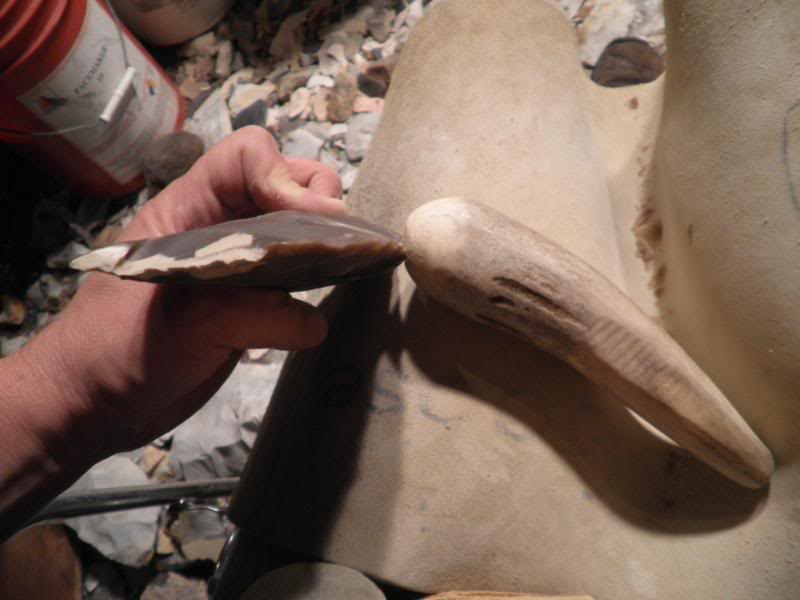
The picture on the right shows the billet pressing hard and inward on the outside edge of the biface. What this does is firmly seat the "back" edge against the hand. Dampening the opposite edge to the one you are hitting does something to the shockwave as it travels through the stone that helps prevent the point from breaking. On Craig Ratzats video "Caught Knapping" he uses this technique to prevent "endsnap" when hitting the base of a point he was working on. He pressed the end opposite the one he was going to hit against his leg. If you are just holding the point out there without dampening the edge the shockwave does a mean trick and folds the piece or, if you are hitting the base or the tip, it does the "endsnap torture" trick.
After you have seated the back edge it's time to hit your platform. Now before you hit your next platform go through the above list again and then..smack it!
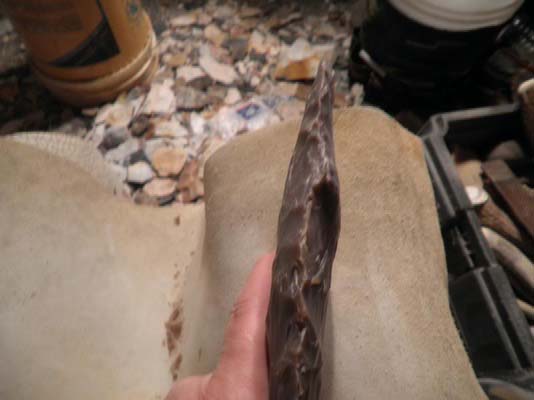
The result of the strike using the techniques described here. The flake was 3 1/2 inches long and traveled all the way across the face to the other side.
Well, there you have it. I think you are going to be very happy with the results if you take these techniques to heart. Using these rules my bifaces went from W/T ratios averaging around 3.5 to 1, to being nicely thinned pieces in the 6/1 range in the course of two weeks-and they're getting thinner. Let me know if this helped you and Happy Chipping!
From http://www.onagocag.com/break.html, April 1 2010, Copied with permission
Note: Wyatt R. Knapp is the author of "The New Atlatl and Dart Workbook" to be released Summer 2010.
Some Talk About Angles
© copyright 1998 by W.R. Knapp
Okay...by now you've learned about herzian cones. You know that it is a cone shaped shock wave with sides that expand outward 130° to the point of impact on the stone. You know we use this shock wave, created from a billet strike, to make flakes come off knappable stone. But now we need to learn how to "cheat the angles" to make the best use of this shock wave.
After much practice you have probably standardized your billet swing so that it is coming down at pretty much the same angle all the time. This swing has become natural to you. You are hitting your platforms pretty much the same every time. Since this swing has become a constant, we have an opportunity to have some control over the thinning process and the length of the flakes we take off.
If you tilt your preform at different angles you can control how long your flakes are and how much material you remove. Depending on how much material you are trying to get through you may have to adjust the power of your strike as well. But a lot can be accomplished by understanding how to use different angles. The illustration below depicts a preform as viewed from the base end. The angle of the strike is indicated by the red arrow. Let's see how the shock wave travels through a stone that's held at this "flat " angle.
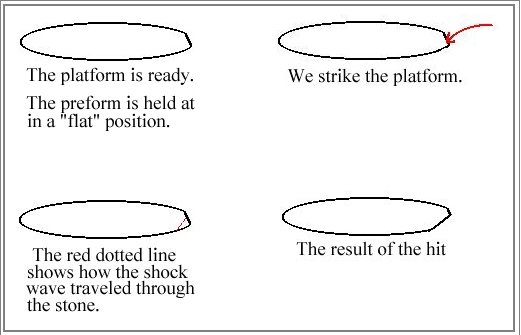
Well, the flake came off. And as you can see, we ended up with a rather shallow result. If we continue hitting our platforms with the preform held at this angle, it will get smaller
and stay thick. We will get points that look like "turtle backs." This won't do will it? Well, let's change the angle we hold the preform at and see what happens.
In the illustrations below we take the same preform we had before and start all over with it. The angle of the strike is exactly the same as before. The resulting shock wave is at exactly the same angle as in the first example too. The only thing different is that this time we're going to change the angle that the preform is being held at. Let's see what happens.
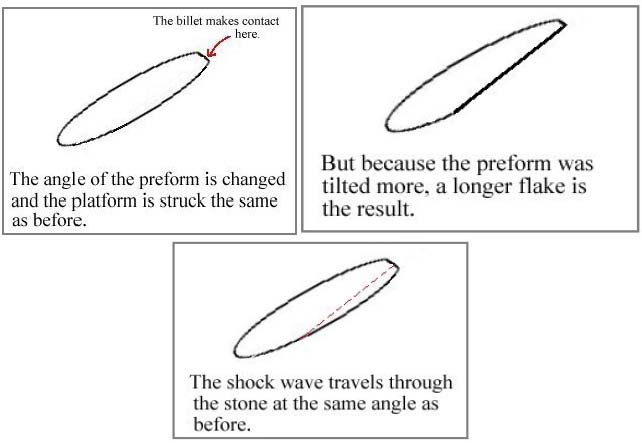
There we go! Now we took a nice bite out of it and got a flake that went right across the middle. If we keep this up the point will get thinner way faster than it gets narrow. By changing the angle we hold the preform at, we can control how thick and long the flake is that we take off. Just don't hold it at too much of an angle or you'll get a hinge or worse--you'll break the preform in half !
Now I should say that the angles that we showed in the illustrations are just examples. They might work for you. They might not. It depends on the angle of your billet swing. But just experiment with how you hold your preforms and see what angles work for you--and then all you have to do is practice enough to remember them.
Judicious use of this idea can really help you to "take the cap" off those really chunky pieces. Good Luck !!
From http://www.onagocag.com/angle.html, April 1 2010, copied with permission.
Note: Wyatt R. Knapp is the author of "The New Atlatl and Dart Workbook" to be released Summer 2010.
Why You Should Work The Ends
and Then The Middle !
© copyright 1997 by W.R. Knapp
My friend John Geyer told me as a beginner to "always work the ends first, then the middle." Of course I didn't quite catch on right away. Too many things to absorb. And with all the herzian cones and angles and platform isolation there's a lot of abstract visualization going on anyway. Well you don't have to worry...I'll show you right now what he meant.
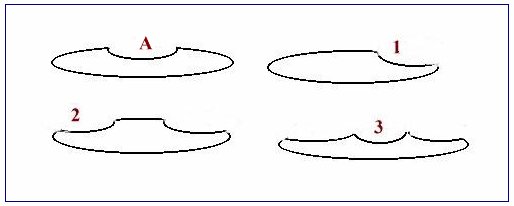
Look at the above illustration. If you were to take a flake out of a preform so that it ended up like figure "A" what do you think would be likely to happen on your next strike? Well, because the preform is so narrow in the center compared to the rest of the preform, it is likely to break in half. Now I drew these examples a little exaggerated for clarification. A real life example could be a lot more subtle. But the result would be the same.
But there is a solution to this trap! Work the ends then the middle. Our first move would be to thin the end like we see in figure 1. Then we would go to the other end and work on that. (fig.2) Finally we would work the middle (fig.3), because now that it has enough bulk to stand up to the strike there's less chance of breakage. And look at the added benefit we achieve. Nice ridges to follow on either side of the middle for our next strikes. When you plan your strikes like this you will notice a more deliberate and "right" look to the scar patterns on your preforms, and they get flat fast!
Now lets use all this on a real life example.
Flakes 1 and 2 are taken from the base end.
Flake 3 is taken off the tip.
And now flake 4, the middle, is taken off. Because the middle had such a nice ridge, the flake flew clear across the piece--six inches. This preform is six inches wide and seven and a half inches long. but it has already become quite flat on this side with just a few hits because the techniques we have learned here were followed.
So see if it helps you to "work the ends, and then the middle." Good Luck!!
From http://www.onagocag.com/buff.html, April 1 2010, copied with permission
Note: Wyatt R. Knapp is the author of "The New Atlatl and Dart Workbook" to be released Summer 2010.
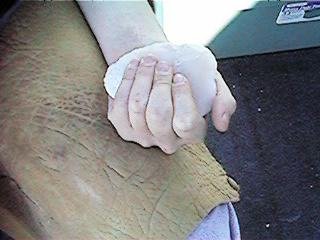
Knapping on the Leg
© copyright 1997 by W.R. Knapp
Well, you've probably heard of it already, but I've used this method for a while now and I think its great. Its worth looking at why so many knappers are using it. It isn't the only way to knap, but I have found that I have better control and accuracy this way.
You see, quite often with freehand knapping you are holding your preform out in the air with one hand, and your other hand is holding the billet out there. Then you take your swing and you hope that you kept everything in position during that time and didn't flinch, or tilt the stone, or any of the hundreds of other variables that can occur.
Well, when freehanding it, you can cut down on these variables by resting the wrist of the preform holding hand on your leg. Then anchor the billeting arm by resting the elbow against the side of your body. This way you can adjust the "feed" of your preform into the anchored path of the billet swing.
But you can take it a step further.
Why not rest the preform on your leg where you can easily hold it at the proper angle. Your wrist won't change, the action of making your billet swing won't wiggle things and change them, and you won't flinch at the last second. Remember to still anchor your billeting arm as before. The more you can control the variables, the more accurately you will be able to knap.
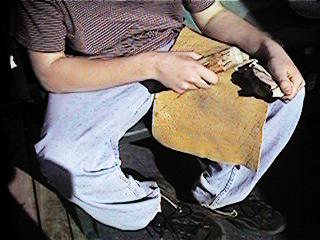
The picture above shows how easily the angle can be determined on the knee. The hand would then rest flat on the preform to press it into the pad and prepare it for the strike.
The picture in the section below shows how this all comes together. Notice how easily the preform can be held at the correct angle.
From http://www.onagocag.com/buff.html, April 1 2010, copied with permission
Note: Wyatt R. Knapp is the author of "The New Atlatl and Dart Workbook" to be released Summer 2010.
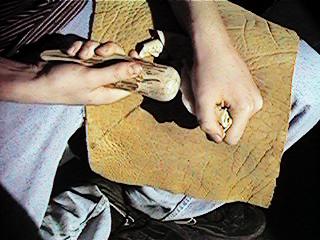
Buffalo Hide As Leg Pad and Preform Shock Dampening Tool
© copyright 1997 by W.R. Knapp
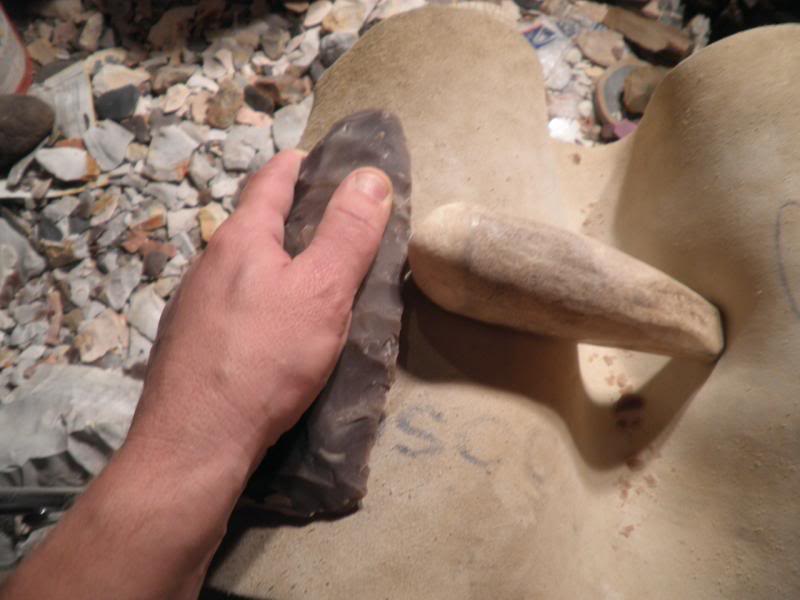
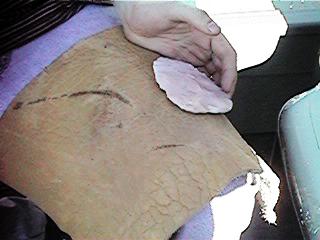
You probably noticed the buffalo hide leg pad in the above photos. This hint will work with any leather pad but the buffalo hide seems more supple and thicker, and more perfectly suited to this next tip.
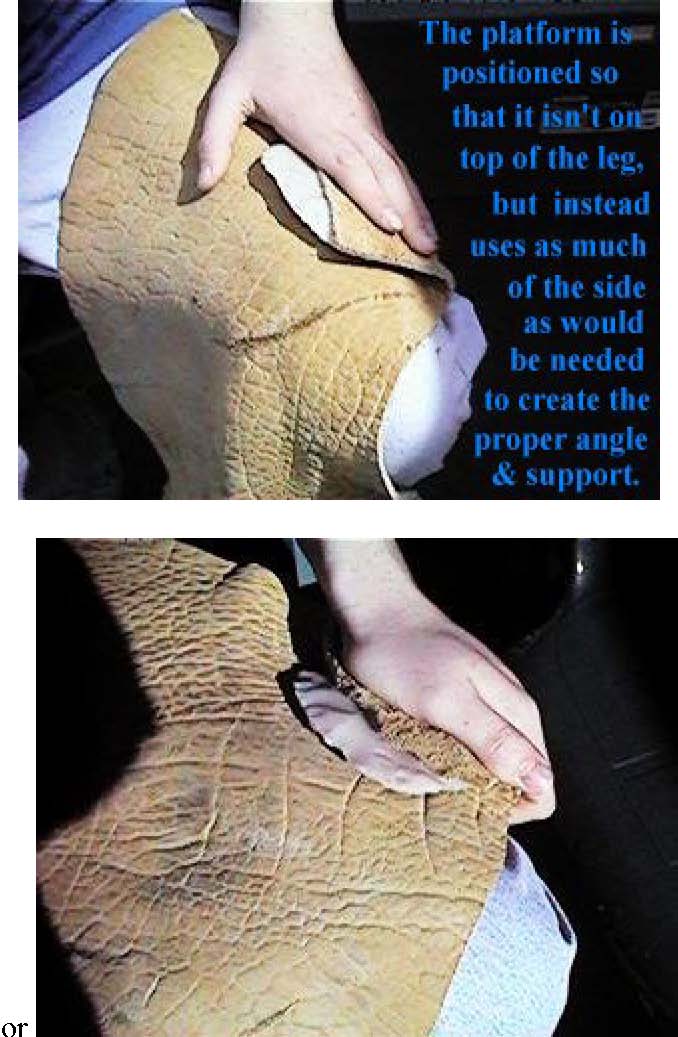
When knapping on your leg as described above, you have a very handy tool for support, and shock dampening. Just fold the edge of the lap pad over the preform as shown and seat it into the resulting pocket with your billet. Now when you smack the platform, not only is everything locked into the proper position, but the stone is supported and dampened, and the hand holding the preform is protected. And you didn't have to pick up another pad or put on a glove to accomplish it!
Now there may still be situations where you would want to use the "pull" the flake technique and you would need to adjust your knapping style to accomplish it. But otherwise you may find this style of support helpful. (You may be able to "pull" the flake by pressing and pulling on the area from the bottom and through the leather.)
Knapping on the leg has been a great help for me. I realize that everyone has their own style. But if you have been having trouble with the accuracy of your strikes, or holding the proper angles, give this a try for several knapping sessions and see if you don't find it a big help. Many of the experienced knappers I have seen use this. And if you hit the platforms right you don't have to worry about hurting your leg because most of the shock is used up with the flake detachment. I don't get any bruises or sore legs.
From http://www.onagocag.com/buff.html, April 1 2010, copied with permission for free distribution only
Note: Wyatt R. Knapp is the author of "The New Atlatl and Dart Workbook" to be released Summer 2010.